Showing posts with label Skirts. Show all posts

Monday, 13 June 2016

Clémence skirt

Greetings!

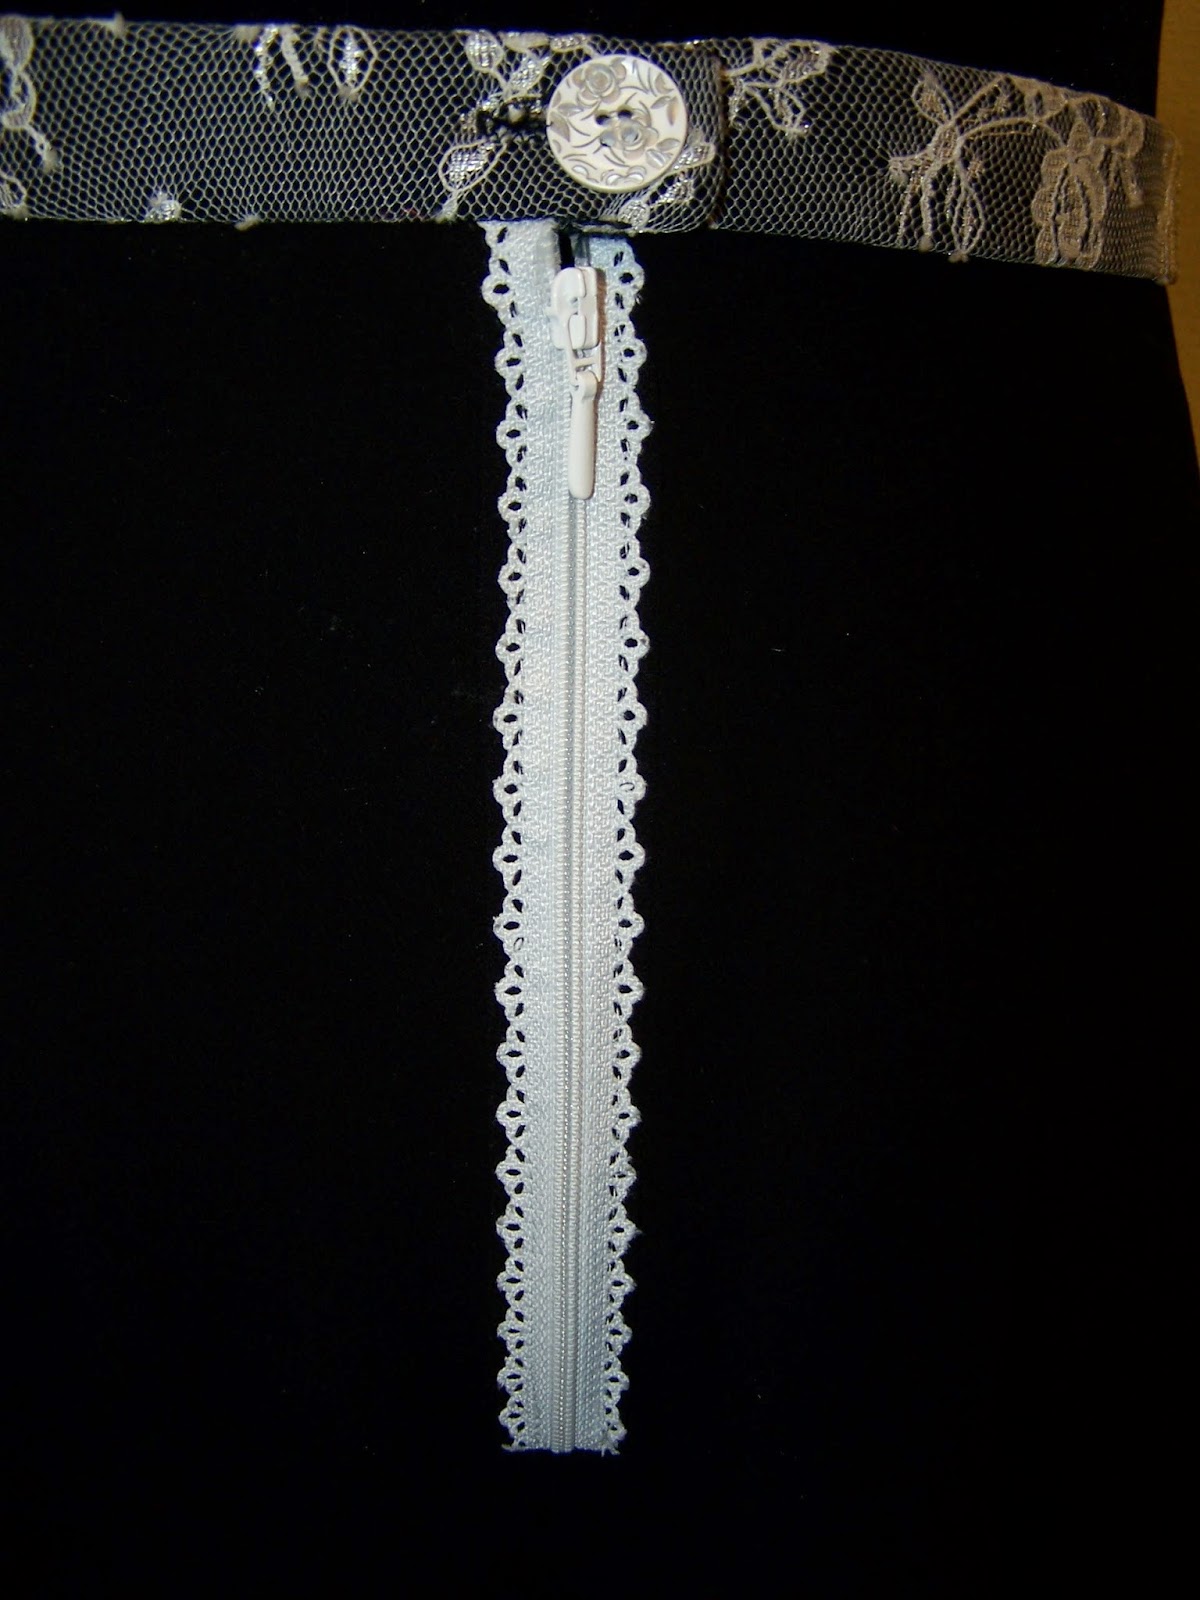
In my quest to add more basic pieces into my wardrobe, I made this simple black Clémence skirt from Tilly and the Buttons' book Love at First Stitch. It's a very basic gathered skirt with a simple waistband. I did add pockets to the skirt because pockets are awesome.


The fabric is the same wool and synthetics mystery fabric from my stash I used to make this skirt. The fabric is a bit thicker and is warm in the cold seasons but I've discovered during the few hot days this year that it's also surprisingly cool to wear.


I also chose to deviate from the instructions when it came to installing a zipper. I opted to use a visible decorative zipper instead of an invisible zip. To finish the seam allowances, I used my serger and I hand hemmed the skirt with invisible stitching.

Friday, 20 May 2016

Pleated Tartan Skirt

Once upon a time I scored this nice wool and viscose blend fabric with colorful tartan pattern. The issue was what to do with it. I only had about 0,45 cm of it. One day I was looking at the Lace Waist Dress which was hanging in my closet and had the idea of using the skirt pattern pieces and making this fabric into a cute little skirt.


I cut the skirt as long as I possibly could and did no further fit changes than I did on the dress. However I drafted a waistband and cut it out from a plain black fabric from my stash. I inserted an invisible zipper in the center back seam and serged all the seams. I hemmed the skirt with invisible stitching by hand.


I love this skirt to pieces. And I'm pretty darn happy with the pattern matching. It was a pain(especially when it came to zipper insertion) but super rewarding in the end. Also after three wears the zipper broke(booo, bad zipper!) and the skirt travelled back to the UFO pile. However after a while I unpicked the zipper and inserted a new one and *knock on wood* three months later it's holding up just fine. Yay!

Thursday, 31 March 2016

Woolen Circle Skirt + a Giveaway&Discount!

Hi. Today I have a really short post which will get me back on track with blogging. A self drafted circle skirt with pockets. 


The skirt itself is a basic circle skirt drafted based on my measurements. For comfort and stashing purposes I added inseam pockets to the side seams. The skirt fastens with an invisible zipper. The seam allowances are finished with a contrasting red overlocking seam and is hemmed by hand with invisible stitching.


The fabric came from my stash. It traveled there after my gran moved out of her house and in with my parents and found a bunch of fabrics from her closets and gave said fabrics to me. This was one of those fabrics. It is a woolen and synthetics blend. Which mean it's warm without feeling too thick or woolen(if you know what I mean)


I love the movement of this skirt and it's perfect to wear with a fun shirt or a blouse. A true wardrobe staple. I've been distracted by fun prints and discarding "boring" basics sewing that it has been challenging to find cohesive outfits at times. So I made a commitment to sew a few basic items that can be mixed and matched with multiple items in my wardrobe.


Now for the Giveaway and a Discount.
I am giving away 20€ to use in my Etsy shop. For details how to enter, read this post on Instagram. Additionally I am offering a 10% discount in my shop with the code HURRYUPSPRING (code is valid until 10th of April)

Thursday, 17 March 2016

Pattern Testing: The Nita WrapSkirt

A few weeks ago I heard whispers that Beth from SewDIY was looking for some pattern testers for her new pattern and I decided to join in on the fun. 


The Nita Wrap skirt comes in three views and I chose the first view which is the "mini" version. As I love my skirts and dresses to end slightly above my knee and after consulting the size chart, I knew that it would be the perfect length right out of the bat. I sewed up size 10 and did no fit alterations. And as you're supposed to try on the skirt before sewing on the buttons/finishing the waist to determine how much you need to overlap the pieces, you'll get the perfect fit for your waist without figuring whether the pattern ease is to your liking.


For my version I used a piece of lightweight denim from my stash and managed to eek out the skirt from a bit less than 1m of fabric. I serged all the seams and went for the simple button closure on the waistband.


I've already worn it a bunch of times and it's so easy to put on in the morning. No fuss with zippers and stuff. Just one button and one hook. Easy-peasy. Even though I was worried that wearing this skirt might become too exposing while sitting behind the sewing machine or doing other various things, I've not yet managed to show the world things they aren't supposed to see. 

Monday, 5 October 2015

Summer Rush Skirt

I was approached by a woman who had a skirt problem which was she needed one for her holiday in Greece. Only problem was she was leaving in a week. Time management at its finest. But as she wanted a relatively simple maxi skirt, I decided to give her a hand and bump her up the work list.


She wanted a skirt that would flow and be wide at the bottom but wouldn't have any gathers or pleats at the top. And it was supposed to be held up with a wide lycra waistband that would cover half of her hips. So I measured the piece of fabric she brought me and decided to cut out a semi circle skirt.


Another problem arose when it came to lining. The main fabric was quite sheer and would become slightly seethrough in natural lighting, so it needed a lining. But the customer didn't want the lining to be as big as the skirt as it would create too much volume in the bottom and she was scared it would show when the main fabric would move around in the wind. She also hated the idea of a half lining that reaches only the knees. So we agreed that I'd cut out an a-line lining and we'll see how she feels about that. Luckily she liked it and the lining issue was solved.


All the seams were finished with my trusted serger and the hems were roll hemmed.


Thursday, 27 August 2015

Layered Skirt + Technical Difficulties Update.

Before I start talking about this skirt I made, I have to say something. Some of you might have noticed something weird happening with post uploads in the last week or so. Posts that have already been uploaded have been taken down and uploaded again which triggered the notification system for the e-mail subscribers and Bloglovin. For that I appologize. About two weeks ago my PC's motherboard died on me without any warning. So I had no physical PC to work behind for blog posts. I tried to keep the blog alive via phone but the Blogger app on phone is confusing and feels limitating. Especially as when you want to edit a typo in an already published post, it takes it down and re-publishes as a new post. Luckily now thanks to Mr.Man I again have a working computer and I can return to normal means of blogging. Also, before you freak out, we managed to retrieve all the files so no pictures, pdf patterns, etc were lost so at least there's that. Again, I appologize for any inconvenience the new post notification system caused.


Now. On to sewing talk. I made this maxi skirt in June. The customer at first wanted to have only the two layers of the main fabric but luckily I was able to convince her that she needs at least a short linging as the fashion fabric was pretty see-through without it.


The main fabric is a polyester knit that has a wrinkled look and had been collecting dust in the customer' closet for years. She also found the elastic band from her house and said she has no idea when and why she bought it. But sometimes things don't need to make sense, they just need to work. And by sheer coincidence, these two work together like a charm.

The lining is a viscose and polyester blend from my stash.


To finish the seam allowances on the main fabric, I used my serger and for the lining I used french seaming. To hem the lining I used rolled hem and for the main fabric I created the lettuce hem with my serger. (Like for this dress)


The pattern is self drafted and by that I mean, I drew a box on the fabric, made it slightly wider at the bottom and cut it out. And then did the same thing only slightly shorter. Nothing fancy or tricky.

Monday, 16 March 2015

Pattern testing: The Lou Box Top (and a self drafted skirt)

Heidy-ho, peeps! Once upon a time I did a teeny-tiny bit of pattern testing for Beth's new pattern- The Lou Box Top. And here's my make.


Lou Box Top is a loose fitting top with two neckline and three hem options. For my version I chose the crewneck with dipped hem. I followed the instructions to the dot and thought they were pretty straight forward and clear. However I am not sure if I'll be following the given instructions the next time I decide to sew this pattern as I am pretty bad at following the instructions unless I absolutely have to. I'm an adult, I do what I want to do, haha.


For the fabric I used this very drapey and silky feeling rayon, that I got from my Gran S. It has a big issue with the white dots bleeding all over the fabric so I thought it's the best if I used it for projects that might end up as a giant flop.


For this version I sewed the size M/L and I feel it looks great when tucked into a skirt. However if I were to make it for wearing over jeans I'd cut out a smaller size maybe even go as far as cut out the smallest size to lose a lot of that ease.


I think this is my favorite part of this top. This little button loop and that pearl button. It looks so cute on this dotted fabric. There is something magical about dots and pearl buttons. *swoon*

All the seams are finished on my trusted serger and the hem+sleeves are finished with a rolled hem. I hand stitched the bias tape on the neckline because for some reason my machine DID NOT like this fabric. Kept skipping stitches and stuff. I think the thread is the culprit here as I've had similar problems with different fabrics but the same thread so...Might have to toss it or just use it for only bobbin.


And now the skirt. It's a semi circle skirt with pockets and an exposed zipper. If I'd tell you that I knew exactly what this skirt would look like when I cut it out, I'd be lying. At first I planned on making a very simple black short semi circle skirt with pockets. Most important part of that plan was the pockets. Because pockets are awesome. And then I had to drop by the local fabric shop for other stuff and saw this cute lacy zipper. So I had to get it and put it on the skirt.

Then I thought that only having white zipper and everything else black would look strange and I decided to use a bit of white lace I had lying around for the waistband. So I guess this skirt is all about making things up as I go. And sometimes it's good to not have a solid plan. Because reasons.

The skirt is finished the same way as the top. Seams serged and hem rolled.


Have you ever had a project that you kept changing and designing as you went along? How'd it go?

Wednesday, 24 September 2014

Self Drafted Culottes revamp

 What to do with long culottes that don't fit anymore? Obviously a skirt for the upcoming spring and summer. And not just any skirt. A gored skirt with a bit of flare at the bottom.

Pattern: Self drafted
Fabric: Lining and floral outside fabric are both 100" polyester
Time spent: As I had to do a lot of seam ripping before I could start cutting out the pieces, I spent a total of 5 hours on the drafting, seam ripping and sewing.

I've decided that I'm going to put "names" on customers, so that I'm not like "this lady and that lady" every post.

Let's call this one Ms.E, who came to me with a pair of culottes, that didn't fit her waist anymore and she didn't like the design much. Plus the fabric choice seemed a bit strange for a garment like this. But the print on the fabric just screamed summer and skirts. So I turned an old pair of culottes into a new awesomesauce skirt.
Before
After


Lining and waistband


First I had to engage my seam ripper and undo all those seams. Then after drafting the pattern, I just cut it out of the pieces of the fabric. I used everything from the old garment. If it's not broke, why fix it? I reused the old invisible zipper and buttons, the old lining. But I did make a new waistband, because the old one was basically a bias tape, and it looked a bit too thin for a waistband for this skirt. It was a relatively quick project and it was a delight to sew. Plus Ms.E said that she has a dress she wants to revamp somehow and after seeing how something she couldn't wear became something she couldn't not wear, she has to go through her closet with a  scrutinizing eye :)


***
Fooniks
***

Saturday, 13 September 2014

Moneta and Delphine Smashup

So I might or might not have been sitting here, watching the screen for the past hour or two and try to think of a good(ish) introduction for this post and my mind came up with blank. Well it didn't exactly come up with blank, it came up with EVERYTHING BUT something to say in an introduction for this post so....[Introduction]blah-blah-blah-blah, you don't want me ranting about random things anyways and want to hear about these things I made [/Introduction]

So I made a Moneta. Again. I might or might not need an intervention. But that's not really important. What is important is what I did with this version. I've so far done four versions of this pattern: One, Two, Three+Four. And when I was preparing myself to cut out my Myrtle, I realized that if I cut my Myrtle as a top, I can use the rest for a Moneta top. Winner, winner, chicken dinner.


Pattern alterations: I cut the bodice out straight up size M, so no changes there, for the lower part, I placed the bodice piece on top of the lower piece, to have matching seam lengths and then slightly made it wider as much as I could. By now I was really doing some puzzle matching and couldn't morph the top and lower pieces into one. I also realized that I didn't have enough fabric to make the short sleeves that I originally planned, so I decided to make tiny cap sleeves that are slightly ruffled.

I used serger to sew all the seams. I used the twin needle for hemming the bottom and to finish the sleeve edges, armholes and the neckline. I didn't feel like making anything fussy for the neckline and reckoned  a simple twin needle finish would be enough and I quite like it.

Mr.Man, what are you taking pictures of? Beeeewbs.
I think you all have heard/own a copy of Tilly's book Love at First Stitch. It's an awesome book with five printed patterns plus additional instructions to draft two patterns. The book is full of witty comments, smart tips, plenty of directions for different methods and it's all illustrated by gorgeous pictures. After I found my book in the mail, I was obsessed with it, I kept scrolling through it and couldn't put it down. One day I decided to start working my way through it. No matter how many skills you have, it doesn't hurt to go through the basic stuff to reinstate your knowledge.

I skipped the Brigitte scarf(I'm really not a scarf kind of girl) and went straight to the first skirt. The Delphine. And what a delight she is. As the fabric I chose a piece of mystery blend I had in my stash. Is't a grey fabric with tiny white triangles in it. I'm yet to go a burning test to determine the compound of the fabric. Anyways.


I cut out a size four. It seemed to fit my measurements the best and as it was my first version, I decided to keep it simple and test it out. I followed the instructions to the dot(for a change) and when I got to trying it on I saw that the fit was quite good. I loved the length and how it fit my hips. But it was a bit too loose around my waist and only in the top part. So I changed my waistband pieces a bit and took in a bit from the very top of the waistband and gradually connected the lower point of the waistband that fit with the new top point. So in the end I took in a total of 6cm from the top of the waistband while the bottom of the waistband remained the way it was on the original pattern.

Itty-bitty print matching, yo.
For the skirt I finished all the raw edges with my serger, I used a rolled hem to finish the hem and I used an invisible zipper as per instructions. While wearing the skirt I noticed that the fabric is a tad bit too stubborn for the invisible zipper and the fabric gets a bit in the way while unzipping or zipping up the zipper, so I might change the zipper at one point, or I might not, we'll see. The fabric has one other fault as well. It gets stuck a lot, if there's a TINIEST bit of some sort of a surface that it can get it's threads stuck to, it will, so I already have a few white threads sticking out so I need to be really careful of what I'm doing while wearing the skirt and I've got to hide those loose threads when I see them. But that's the fabric's fault and not the pattern's. The pattern is a delight and super easy to make. I'm sure I'll make another one in the future, I already have a fabric for it in my sights.

Thursday, 24 July 2014

Self Drafted Simple awesome skirt

Today I would love to share a simple but awesome skirt I made. It's a lace skirt with satin lining. As it fits quite snugly and is slightly narrowing in the bottom I also made a back slit/vent. It fastens with a zipper and a hook and an eye. And per Mrs.LS request, there's no waistband.


Pattern: Self drafted
Fabric: Cotton and polyester lace and satin for the lining
Time spent: 3 hours

Originally we planned to use invisible zipper as she didn't want the zipper to be visible but after I sewed the zipper in, I realized that it wasn't going to work. The lace is quite stiff and thick and it got all stuck in the zipper. So it would have been very difficult to get the zipper open and closed and in the end it would have just broken either the zipper or the lace or both. So I used a regular skirt zipper instead. And in the end it's barely visible. But unpicking invisible zipper for this thing...not fun.


To finish the waistline I used a facing and I stitched it down to the lining so it wouldn't start to peek while wearing.

I really struggled to get this thing out of the fabric because Mrs.LS brought me very little fabric. An by very little I mean 0,5m. The skirt is 65cm long. Little math told me that it's not enough fabric. But stubbornness won and I ended up cutting the whole skirt flipped 90degrees. So now the lenghtwise grain is actually crosswise grain and vice versa. Oopsies. But the fabric has very little stretch and if th whole thing is cut in the same direction, I think it won't be too much of a problem. I hope.

For hemming I kept the lace edge as it was(because it was the selvage of the lace). And for the lining I roll hemmed the bottom. All the seam allowances are serged.

All in all, I think unpicking that zipper was worth it in the long run and I am pleased with the end result. What can I say, I'm a sucker for lace.

****
Sidenote: I seriously need to pick up the slack and try to blog about all the projects I have finished(and even photographed some of them). So don't be surprised if during the next few weeks I post more stuff more frequently.

Tuesday, 6 May 2014

Self Drafted Zig my Zag

You can tell that it's spring when nice things are popping out of your sewing room like flowers in the flowerbed.

Mrs.RS jumped into my studio a few weeks ago with a funky little fabric. Her desire was a skirt and a waistcoat ensemble. Her wish is my command and here we are now.


The fabric is a knit woolen and synthetics blend with a touch of elastic in it. Plus it has a trippy zig-zag pattern on it. Which meant that I had to pay more attention to details to make the lines continuous through the seams. Which is both easier and harder to do on knits.


This time there's a lining! Not silver lining but still a lining! I miss making linings for things. There's a lot of misconception when it comes to lining here. People seem to think that when there's lining the garment is more bulky and will add mass to the figure. Oh boy. Even after thorough explanation people prefer not to have lining on their garments. Such a shame. But not this time. The waistcoat and the skirt are both lined and I am so happy!

Pattern: Self drafted
Fabric: wool and synthetics blend + viscose for lining.
Time spent: Roughly 6 hours.


First let's talk about the waistcoat. It's a very simple and classical waistcoat. No pockets or any schebang. I used interfacing for the whole thing instead of just for the front and side because the fabric is so stretchy and acting like wool knit is supposed to act, it needs the interfacing to look like it's supposed to look in a classical garment.  I had very little of this fabric, so for the inside I had to use lining fabric up until the front edge and couldn't use a cover piece. I topstitched the edge and the armholes to keep the lining from peeking and to maintain the shape.
I have to admit. I've done only one real waistcoat prior to this and I was very nervous cutting this thing out of the fabric. But I muscled through it and am very happy with the result. Though I did sew the lining in the armhole wrong at the first try and I had a weird tube instead of a waistcoat. (Note to self:Take pictures of your embarrassing fails)


 The skirt is a very simple pencil skirt with zipper and button fastening and a classical slit in the back.

The waistband is cut in two pieces because there wasn't enough fabric to get one long strip, so I had to have two shorter strips. It annoys me that it wasn't possible to mach the pattern for the waistband but what can ya do.


I can't wait to get my new dress form! A few more days but until that it's pictures with ill fitting mannequin. It doesn't do the garments any justice. But the new future is on the horizon.

This week is an exciting week for me. The local newspaper is doing a story about me. Unfortunately it won't be in English. But there should be some fancy pictures about my studio. So maybe a workroom tour is in order for you guys :)
STAY TUNED!


***
XOXO
Fooniks
***

Saturday, 19 April 2014

Ulyana Sergeenko Challenge- Monochromatic Mickey

A while back I stumbled upon a post by the lovely Kristin from Sew Classic where she announced the Ulyana Sergeenko Challenge. I haven't heard the name before(apparently I have been living under a rock) but after seeing her creations I was instantly in love. All the feminine lines, the sexy yet classic look. What's not to love!

So this is my face.
I instantly felt like a semi circle floor length skirt or dress would fit like a glove. And after looking through my stash I found an awesome white cotton jersey fabric with Mickey Mouse print on it. I had completely forgotten that I had this fabric(even though I had almost completed a tank top(ish) shirt from it. (Man, I've got to finish that thing.)


For the shirt collar and front placket I used black cotton jersey and I used heat infusable interfacing to make sure that it will hold the shape I wanted. For shirt closure I used snap fastenings instead of buttons. The sleeves are quite loose and I actually like it for a change. All my other t-shirts have snug fit around the arms and I thought that maybe for the summer it would be more comfortable if it's not so much against the skin.
For the skirt I used the same fabric as I used for the Julia Dress. For a few seconds I considered making the skirt with full circle pattern, but I decided(hoped) that semi circle would be more flattering on my body. The skirt has invisible zipper and a button closure.


I love this button.
Look at these happy guys!
Pattern: Self drafted
Fabric: Shirt-cotton jersey  Skirt- chiffon
Time spent: Around 6 hours on the whole outfit


I absolutely love this look and I know that I will get a lot of wear out of these two.

The photographing part was so awkward for me. I had a hard time keeping a straight face and not laughing uncontrollably(so did Mr.Man who was behind the camera). I usually try to avoid being caught by the camera and I don't know how to behave in the pictures to look...well...normal. I need some practice. I guess MeMadeMay will give me a lot of that.

***
Fooniks
***