Showing posts with label Dresses. Show all posts

Monday, 3 October 2016

Owl Simplicity 1803

Welcome to my third rodeo with Simplicity 1803. You can see Muslin and Floral if you click on the links. The pattern seems to be discontinued/out of stock on Simplicity website, but fear not, I found a few for sale on Amazon(affiliate link)


Just like with previous makes, I sewed up a size 12 dress in view A with cap sleeves. I did no further changes to the fit aside from what I did last time as I had marked those changes to the pattern already.


The fabric is a fun cotton with owl and mushroom print, it's such a fun fabric, how can I not love it? I overlocked all the raw seam allowances to prevent fraying and used a rolled hem for the sleeves and skirt. I skipped the belt and pockets as I was in a bit of a hurry to finish the dress. I mean it's perfectly normal to decide the dress you want to wear in the evening isn't even cut out yet, right? Good thing I can sew fast, otherwise I'd be tucked in to the loony bin ages ago.


Wednesday, 14 September 2016

Amy Dress

That moment when someone in your family is getting married and it's taking up all your time after you just got your blogging groove back. Whoops. But I'm back again with another self drafted dress. After this post I'll be returning to showing you things I've made with other's patterns.


This is the Amy dress which is a nice summer dress with a cotton lining and linen fashion fabric which has pale blue stripes. I had to attend a nautical themed party and instantly thought about a dress made from blue-white striped fabric. And to my luck I found the perfect fabric which had the stripes running lengthwise which is quite rare in the shops in my area. As horizontal stripes make me look shorter and wider than I actually am, finding this fabric was like winning the jackpot on the lottery.


For the bodice I used my own bodice block which I drafted last year. The skirt is a 3/4 circle skirt and has pockets in the side seams. The lining skirt is a half circle skirt. I left the bodice seam allowances raw as I stitched the waist seams of the main layer and lining together and there should be minimal fray. The skirt seams are finished with the serger and both of the hems are rolled. The dress fastens with an invisible zipper in the left side seam.


This dress makes me wish the summers were longer here as it's such a great dress to wear but it's not appropriate for the colder seasons. *sob*

Thursday, 1 September 2016

Hailey Dress

The weather today is absolutely horrible, so I'm going to look at photos taken on a nice summer day and talk about a pretty dress. Maybe it'll make the weatherman feel guilty and make the weather nice again?

This is the Hailey dress. Made from my bodice block(which I also used for this dress). The fabric is a lovely lightweight linen and cotton blend that I bought with the idea of a simple dress. And finally it became what it was destined for - a dress with a fitted bodice and gathered skirt.


The bodice is lined with a light cream cotton fabric. The raw seam allowances of the skirt are serged and the hem is also serged and then turned back and stitched down. The dress fastens with an invisible zipper in the center back.


I love this dress so much. It's one of my most worn pieces of the summer and I am no where near being done with it. The only downside of Hailey is that the fabric is so light that it flows a bit too much in the wind and I've had a few incidents where I've gotten VERY close to pulling a Monroe. Maybe I should sew a strip of lace to the hemline to weigh it down?

Friday, 26 August 2016

Hawthorn the Dress

 Hey look I'm over my writer's block after a few months of being super busy in the studio. 

 This is my first Hawthorn dress, but not my first Hawthorn rodeo. This time I kept it super simple with no sleeves or collar(aka I didn't have enough fabric. If someone writes this to my tombstone, I won't mind). It's a size 10 bodice with the changes I made to my Reversible Hawthorn Blouse. The skirt portion is a simple rectangular piece that's gathered in the waist. 


The fabric is a vintage cotton which I scored from an online auction ages ago but like most fabrics I own, it simply traveled to the stash to wait for its turn. I'm happy I chose the Hawthorn for this one. The seams are finished with the serger, the hem is overlocked and turned back once and stitched down. The armholes are bias bound and the neckline is finished with the facings that came with the pattern. I found these cute black buttons for fastening.


This has been one of my favorite pieces this summer. Simple and fun to wear and feels super comfortable.


Monday, 4 July 2016

Linen Clover Dress

SHE'S ALIVE!!!! Time has been running away from me like Sonic the Hedgehog recently. How have you been? It's so good to be back!

Today I'd like to show you a fun and cool summer dress I made for myself. 


This is a bright linen Clover Dress (pattern by Papercut Patterns). For my version I cut out size S, even though based on my measurements I should have cut size M, but after I looked at the finished measurements, I saw that with the ease S would fit me better.


The fabric is a border print linen that I scored from the remnant bin last spring. I decided to place my pattern widthwise instead of lengthwise on the fabric so I could play around with the lovely pattern. One side of the fabric had flowers and other had blurred wide strips of red, black and cream color. Due to not having enough yardage to cut out the dress in full hem width, I slightly reduced the width gradually. 


I love wearing this dress with a little black belt. The semi loose fit is great for the summer heat and the linen fabric allows my skin to breathe and is nice and cool to wear. While sewing I thought that I might have gone too far with the bright colors and colorblocking but in the end it doesn't even matter it turned out great.


Monday, 30 May 2016

Rayna Dress.

 Today I have a treat for you. When it comes to sewing for myself, I usually use patterns made by others as I don't feel like drafting a pattern for myself after I've dealt with drafting patterns for everyone else. Cobbler's children and all that. But when I was working on making my own wedding dress I decided to kill two birds with one stone and made me a bodice block that fits me. Since then I've used it a few times and this is one of the results. The Rayna Dress.


I had to attend a birthday party of a near and dear relative who turned 80 years old. I decided to make a simple dress with the fabrics I had in my stash. I had two rayon fabrics with sheer patterns and even though the pattern was slightly different, I figured it wouldn't make too much of a difference and would add an interesting twist. I also wanted to use this red cotton I had in my stash and decided to line the dress with it and add a contrasting waist piece.


I didn't want the seam allowances to be seen through the main fabric so I decided to use the red cotton as an underlining in the bodice. I finished the seams with the serger and used a bias tape to finish the neckline and armholes. 


I encased the bodice in the waist seam and sewed the two skirt layers simply onto the waist pieces, serged the seam and press it towards the waist. I also inserted an invisible zipper into the left side seam.


The hem of the main fabric is finished with the rolled hem setting on the serger. For extra oomph for the skirt, I finished the lining skirt with a horsehair tape and I love how much the skirt flares out. Makes me feel like a million bucks. Especially when paired with a killer pair of red shoes.


Monday, 14 March 2016

Stewie Moneta

Heya. Today I'd like to return to a deeply loved pattern I haven't sewn in a while. The Moneta. This time it's in a fun Stewie Griffin print jersey that looks fun and carefree at first but true to Stewie's personality is filled with messages he would say.


Again, I sewed up size M with no alterations apart from shortening the skirt. All the seams are finished with the overlocker. the hem and sleeve hems are finished with twin needle. I sewed a strip of fabric to the neckline while slightly stretching the band and it gave me a nice finished neckline with a neckline band. I added an elastic silicone strip to the shoulder and waist seams for stability.


Other than that I have nothing to say except I love this dress, but you all already knew that because it's a Moneta and it has awesome print.


The fabric is from a remnant bin in Abakhan and it's so freakin' awesome, I could cry. I actually bought it with the idea of making a shirt or two for Mr.Man but that didn't happen and the fabric had been sitting in my stash for almost a year. But then we were going to see the latest Star Wars movie and I felt that I absolutely needed to make this fabric into a dress so I could wear it to the movies. With two hours left until the end of the work day and until I had to leave home for the cinema, I pulled out the fabric and was done with plenty of time left. Aaaaaaaaah, the joys of TNT patterns. They whip up so fast.


For previous Moneta versions I have made, follow these links:

Tuesday, 16 February 2016

Yellow Dream- A self drafted dress

Happy Tuesday! Today I have a simple yet beautiful dress to share with you. 


This is a dress with a fitted princess seamed bodice, gathered skirt and cap sleeves I made last summer for a customer who said she was in the fabric shop, saw this fabric and simply could not leave it behind.


The pattern is self drafted and this shape seems to have become the most popular look in my studio for both selfish and commissioned sewing.


I finished the raw seam allowances with my overlocker and sewed a facing to the neckline. To finish the armholes, I sewed the cap sleeves to the armscye, overlocked the sleeve head and finished the bottom of the armhole with a bias tape. The sleeve and hem of the dress are finished with a rolled hem. And the dress fastens with an invisible zipper in the center back.


I hope this splash of yellow brightens up your week. I am desperately craving some sun and summer and it definitely is showing on my sewing project prep list. I have been prepping and cutting future makes like there's no tomorrow and I would be lying if it weren't mostly bright and summery.

Friday, 12 February 2016

Textured Black Dress

Happy Friday! Or if you've had the week I have, Friyay. After a week of numerous alterations, three dresses and two coats, I am dead tired and very thrilled about the weekend. But before I can head off to a weekend filled with family time, photoshoots, sleeps and dog walks, I'd love to share a dress I made for a customer. 

The same woman for whom I made this skirt, came to me and showed me this fabric and said she absolutely needs a cute little dress she can dress up and down according to the occasion. She didn't want any fuss or bling, a simple sleeveless dress with a fitted bodice and a fuller skirt. At first she couldn't decide whether she'd rather have the skirt pleated or gathered and we decided to see in the fitting which one she liked the best. So for the first fitting, half of the skirt was gathered and half was pleated. In the end we went for gathered look as it looked more harmonized with the fabric.


The main fabric was a knit which was combined of two thin layers. The top layer was attached to the bottom in a way that created this cool textured pattern in the fabric. The dress is also fully lined with the same fabric as I used for this skirt, this dress and this skirt.


The dress fastens with an invisible zipper in the back and the skirt seams are finished with overlocking. The main fabric skirt is hemmed with a twin needle and the lining is hemmed with a rolled hem.


I think the fabric is what truly makes this dress. It was a bit tricky to sew and was blunting my needles three times faster than usual and unpicking seams was not an option as it showed every sewn seam. But in the end it was worth it.


Here's a shot of the lining. Black is such a hard colour to photograph. Nothing really shows. But I promise you, it looked absolutely marvelous in real life. Also pardon the ragged look of my size small dress form, she really needed a change of clothing. And I have re-covered her by now with a cream fabric which should look better for photographs.

Tuesday, 29 December 2015

Lea Dress

I have been sitting on these photos and waiting for writing inspiration forever. After I finished writing my last blog post, I promised myself that come hell and high tide, this would be the next post on the blog. However it was easier said than done.


Like the post has been waiting forever, so has the fabric I used to make up this dress. I bought it a while back and couldn't decide what to make with it. I knew I wanted to make it into a simple shift dress like garment. And then one day Jolie Marie Louise Patterns released the Léa Dress Pattern (currently their site is not in working order) and I was in love. I was actually so dedicated to the project that I made a real muslin before cutting into the fashion fabric. I cut out size ? and basted it together with the longest stitch on the machine. To my surprise I didn't need to make too many changes aside from changing the shoulder seam angle and pinching some excess fabric on the back. After I made the changes on the pattern pieces, I cut out the dress from the fashion fabric. I decided to cut the pocket and front facing from the same fabric I used for these shorts. Then came the fun part. Sewing. I went nuts and top stitched all the seams open and hand stitched the front facing down. Then begun the hunt for perfect buttons, which lasted for a good month or two.


When the dress was finally finished, I was underwhelmed. I loved the pattern, I loved the fabric, I even loved the way it looked. However I didn't love how I felt wearing it. Something feels not quite right. Maybe it's the front facing that makes the front feel too stiff or maybe straight dresses simply aren't my thing. I could tweak the fit in the front and see if that makes me feel better when wearing it, but so far I usually wear it only when I feel like wearing a dress but all the other dresses are in the wash(bad adulting, I know)


Has this happened to you before? Have you slaved away on a project, have it turn out exactly like you envisioned and then still have it be a fail because of something trivial or unexplainable?

Monday, 28 September 2015

Our Wedding: The Dress

How can it be that you want to write a post soo bad but at the same time you really don't want to write it? Because that's the case with this post. I want to share my wedding dress with you lovely people but at the same time I want to keep it to myself. Maybe subconsciously I know that once I put these words and pictures here and hit "Publish" the wedding is officially over and the post-wedding bubble will pop? Whatever the reason, I have been putting it off for long enough and it's time to deliver what I have promised. This is the first post of my wedding series(there are three in total) and it is about THE dress. Ta-dah!

The elusive Mr.Man. In front of the camera for once.

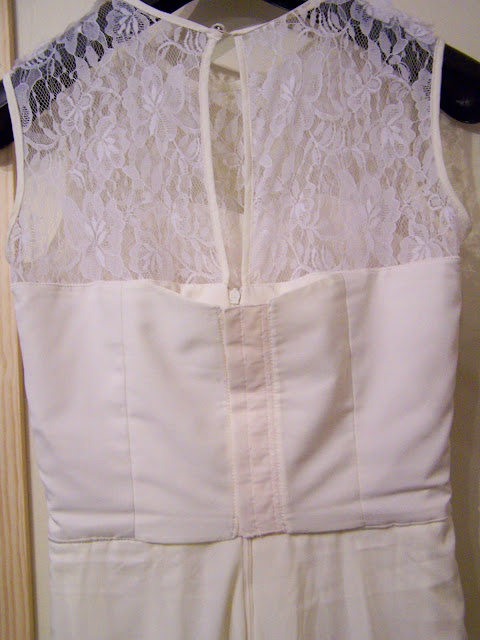
Most girls dream about their wedding day and their dress their whole lives while growing up. I wasn't one of those girls. So when it came to deciding on what kind of a dress I wanted, I was lost. I had no clue. I wanted everything and nothing at the same time. Something that would pop out and be special but that's simple at the same time. So I browsed the internet a lot and after a while I had the idea down. A full lace gown with a sweetheart neckline and lace covering the upper bodice and with a cute keyhole detail in the back.Then came the hard part. Pattern, fabrics and sewing.

When it came to finding the fabrics, I was in luck. I stumbled on a storewide sale of 60% off all fabrics and got the main creme viscose fabric for only 4€/m. Unfortunately by the time I got there, all the good laces had been already cleared out. But luckily a few weeks later I found another sale in another shop and got the lace for 6€/m. 

Originally I had planned on making a built in corset to the bodice but I accidentally found a lingerie corset with proper boning on sale for 14€ and decided to buy it instead and make my life easier a little bit. But despite skipping the boning and other headache inducing steps that come with corsets, I decided to underline all the bodice(both main and lining) pieces with a medium weight cotton fabric to give the bodice more structure and strength. 

Another step I added to the bodice was making a double fastening. On the outside it seems it's fastened with an invisible zipper but on the inside it's pulled tight around the bodice with hook and eye tape. This is to reduce the pressure on the invisible zipper so it can be closed easily and it won't be causing any wardrobe malfunctions by popping open. Also I really liked the secure feeling I felt while wearing the dress. It was NOT going anywhere. Even if I were to decide I didn't like the lace on top and wanted to ditch it at the last minute. The dress would hold itself up, no shoulder straps needed.

I drafted the pattern myself and made quite few muslins to tweak the fit of the strapless part. The skirt of the dress is actually two different shapes. The main fabric is gathered in the waist and simply flares out due to the amount of gathers. And the lace is a semi circle skirt. For the skirt lining I cut out a simple a-line skirt that is long enough to reach my knees. There really wasn't a need for a skirt lining but I was scared the fabric was a little bit too light and under certain light could show something that's not supposed to be seen. 

To avoid any need for seam finishes, I french seamed all the seams. And let me tell you, installing an invisible zipper into two different layers of french seams is a b***h. But still worth it. The raw edges of the lace in the center back, neckline and armholes were finished with a bias tape and fastened with self covered button in the top. Both the hems of lace and main fabric+lining were roll hemmed.


Looking back, I could have tweaked the fit of the lace in the back a bit more, but overall, I really love this dress and Mr.Man promised to love me forever while I wore this dress so I'm gonna say it was a good day.

Thank you for reading. This has been the first part of Our Wedding story. Here are all Our Wedding Posts.
Our Wedding: The Second Day & DIY

Monday, 10 August 2015

Fancy Moneta

Yes. It's another Moneta. No, I am not sick of this pattern. Also. Getting from making this dress to actually blogging about it took me eight months. Uhhhmn, sorry?


This is my eight Moneta (Shoutout to one, two, three and four, five, six, seven.) so there's not much to say about it. It's a collarless size M with 3/4 sleeves. The fabric is a knit and lace combo where the lace is attached on the solid knit with an adhesive. I found it in the remnant bin that is next to the register at the fabric shop. They REALLY need to move that thing. It's not good for my wallet and stash diet.


I made the dress for a New Year's party at our place. I mean who doesn't want to look fancy as hell but still feel like wearing PJ's? However the idea to make the dress came to me on the 31st of December when I had one hour left until the end of the work day. But that didn't scare me. I have made this dress a bunch of times in the past so I know it's a quick project. And I already had black thread on my machine and serger. Win-win. I quickly cut it out and threw it under the machines. One hour and 15 minutes later, I was done. This is why TNT patterns are awesome.


I love-love-love this dress. Ever since I have worn it what feels a million times and I'm sure I'll wear it a million times more until it fades out and falls apart. It's so easy to throw on, put a belt on it and look like a million bucks.

Friday, 7 August 2015

Ellie Dress

Let's mix things up a little bit and talk about a few unselfish sewing projects for other people.

This is the Ellie Dress. A self drafted dress for a young customer.


One day a girl who looked about 14 years old walked into my studio with her mom. She needed a dress for an occasion and couldn't find anything close to what she wanted in the shops. So they handed me a few printed out pictures of different dresses she liked and asked if I can help them. And obviously I was on the job in a flash.


The main fabric is a thick viscose and polyester blend with a hint of elastane. It has quite a lot of weight and thickness. The lace is a polyester blend.


The sleeves are cut as double sleeves, so that there is no hem finish, instead there's a fold line. At first we discussed using horsehair for the skirt hem to give more volume to the bottom but the fabric was stiff enough after hemming it with rolled hem that it really didn't make much difference with the horsehair so we decided to skip it.


The dress closes with an invisible zipper and a self covered button in the center back. The neckline and back of the lace is finished with a bias strip of fabric. The seam allowances are finished with the overlock.