How can it be that you want to write a post soo bad but at the same time you really don't want to write it? Because that's the case with this post. I want to share my wedding dress with you lovely people but at the same time I want to keep it to myself. Maybe subconsciously I know that once I put these words and pictures here and hit "Publish" the wedding is officially over and the post-wedding bubble will pop? Whatever the reason, I have been putting it off for long enough and it's time to deliver what I have promised. This is the first post of my wedding series(there are three in total) and it is about THE dress. Ta-dah!
 |
| The elusive Mr.Man. In front of the camera for once. |
Most girls dream about their wedding day and their dress their whole lives while growing up. I wasn't one of those girls. So when it came to deciding on what kind of a dress I wanted, I was lost. I had no clue. I wanted everything and nothing at the same time. Something that would pop out and be special but that's simple at the same time. So I browsed the internet a lot and after a while I had the idea down. A full lace gown with a sweetheart neckline and lace covering the upper bodice and with a cute keyhole detail in the back.Then came the hard part. Pattern, fabrics and sewing.
When it came to finding the fabrics, I was in luck. I stumbled on a storewide sale of 60% off all fabrics and got the main creme viscose fabric for only 4€/m. Unfortunately by the time I got there, all the good laces had been already cleared out. But luckily a few weeks later I found another sale in another shop and got the lace for 6€/m.
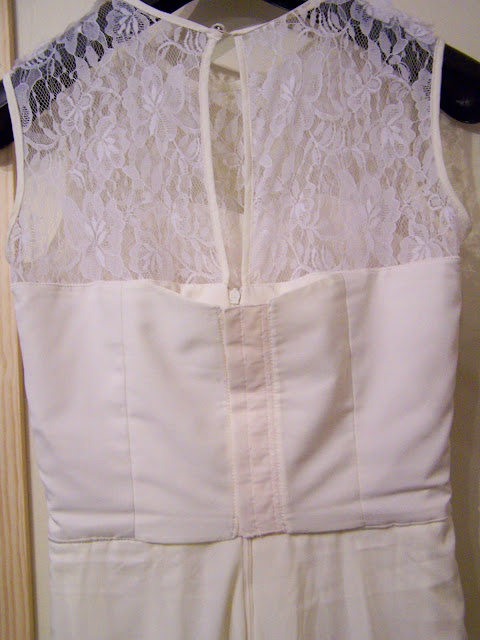
Originally I had planned on making a built in corset to the bodice but I accidentally found a lingerie corset with proper boning on sale for 14€ and decided to buy it instead and make my life easier a little bit. But despite skipping the boning and other headache inducing steps that come with corsets, I decided to underline all the bodice(both main and lining) pieces with a medium weight cotton fabric to give the bodice more structure and strength.
Another step I added to the bodice was making a double fastening. On the outside it seems it's fastened with an invisible zipper but on the inside it's pulled tight around the bodice with hook and eye tape. This is to reduce the pressure on the invisible zipper so it can be closed easily and it won't be causing any wardrobe malfunctions by popping open. Also I really liked the secure feeling I felt while wearing the dress. It was NOT going anywhere. Even if I were to decide I didn't like the lace on top and wanted to ditch it at the last minute. The dress would hold itself up, no shoulder straps needed.
I drafted the pattern myself and made quite few muslins to tweak the fit of the strapless part. The skirt of the dress is actually two different shapes. The main fabric is gathered in the waist and simply flares out due to the amount of gathers. And the lace is a semi circle skirt. For the skirt lining I cut out a simple a-line skirt that is long enough to reach my knees. There really wasn't a need for a skirt lining but I was scared the fabric was a little bit too light and under certain light could show something that's not supposed to be seen.
To avoid any need for seam finishes, I french seamed all the seams. And let me tell you, installing an invisible zipper into two different layers of french seams is a b***h. But still worth it. The raw edges of the lace in the center back, neckline and armholes were finished with a bias tape and fastened with self covered button in the top. Both the hems of lace and main fabric+lining were roll hemmed.
Looking back, I could have tweaked the fit of the lace in the back a bit more, but overall, I really love this dress and Mr.Man promised to love me forever while I wore this dress so I'm gonna say it was a good day.
Thank you for reading. This has been the first part of Our Wedding story. Here are all Our Wedding Posts.
Our Wedding: The Second Day & DIY


Beautiful! I'm so happy that you shared :)
ReplyDeleteThank you so much, Rhonda! :)
DeleteWow, you look beautiful! You did a really awesome job on the dress. I am all for buying RTW foundations and building on top of them. Unless it is something you have been dying to make yourself it's the headache-free way to go. I think it worked out great.
ReplyDeleteThank you! Yes, there's no shame in sometimes taking the easy way when the end result is the same :)
DeleteCongratulations! And thanks for sharing- it's a lovely dress. Hope you and Mr. Man find much happiness in your life together.
ReplyDeleteThank you from both of us! :)
DeleteWow! My congratulations! Your dress is stunning. God bless you!
ReplyDelete