Showing posts with label Pants. Show all posts

Monday, 26 September 2016

Floral Archer Wearable Muslin & Ginger Jeans

Oh my God. Here I was thinking the post went up on Friday. Guess who forgot to press "Publish?" Yikes.

Heya. This post is about a match made in sewing heaven. A button up shirt called Archer and jeans called Ginger. These two are making a frequent appearance in my outfit rotation and let me tell you more about them.


The shirt pattern is the Archer Button Up shirt from Grainline Patterns. For my version I sewed up View A in size 10 in the bust and 8 in the waist and hips. As this is a wearable muslin, I picked a vintage rayon fabric I wasn't too sure about whether I'd like on me or not so if it did end up not fitting me at all, I wouldn't end up wasting a fabric I loved. In the end the fit was pretty good and I love the fabric on me. For my next version I'll need to shorten the shoulders by 1cm and work on the fit of the sleeves.


The issue I have with these sleeves is mainly the width. They are just simply too wide especially at the cuffs. And I'd like to have the sleeves a tad shorter as well. However these aren't issues that bother me enough to take the sleeves apart, just something I'd need to fix on the pattern so the next time I make an Archer, it'll fit me perfectly.


I finished the raw edges with my trusted overlocker and hemmed the shirt with rolled hem. And I decided to use a cornflower blue thread for topstitching just because I can. And it matched perfectly with the blue flowers in the print and also with the blue buttons I chose for the shirt.


The jeans are Ginger Jeans by Closet Case Files and they are my second Ginger jeans which meant I had almost no fit adjustments to do because I got the fit pretty close with my Marble Gingers. The only adjustment I did this time was tweak the crotch seam shape a bit for a better fit and now  I think it's pretty close to perfect. The seams are finished with overlock and I chose a bronze denim topstitching thread to make the jeans look professional. I also installed bronze rivets that match the topstitching thread


The fabric is a simple blue denim I found in the remnant bin and has just enough stretch to be comfortable. Unfortunately it is very prone to pilling and I need to clean up the pills after every two or so washes.


And don't forget! You have until the end of September (01.10.2016 00.00 GMT+3) to get your items from my shop with a 20% discount! 

Friday, 26 June 2015

B&W Tap Shorts

When the weather is cold and rainy outside then blogging about shorts will make the weather better, right? RIGHT?

Last summer Katy&Laney released their first pattern- the Tap Shorts. And I instantly was drawn in by them and made two pairs for myself( Floral and Linen) and during the long heat wave they were my best friends. As the summer should allegedly be here, I wanted to be ready and greet it with new shorts.
Excuse my white pasty legs, it's been a looooooong winter.
Both last year's makes were View C, and I had planned to try out View A and B for this year. But oopsies, I made another C. Mostly because I only had enough of this fabric left for C without any pockets or pattern matching. I cut out size 6 and did no further fit adjustments from the ones I made for my previous versions. I was smart last year and marked all the changes I did to the pattern pieces and cut according to those. Thinking ahead ftw! Though I'm thinking that maybe I should make the hemline lower by a few cm. Last year the length didn't bother me, but this year it feels a bit short. Maybe it's because I haven't gotten used to short clothes yet. And because it's too cold for shorts.


Just like with my floral pair, I serged all the seam allowances and top stitched all the seams open. Call me crazy, but I actually like top stitching. I find it meditating. 


The fabric is 95%cotton and 5% elastane and feels absolutely amazing. I found it in the remnant bin at the fabric shop last year and was waiting for the right moment to cut into it. I knew I wanted a dress out of it, and after I had cut out a dress, I had enough of it left for a cute pair of shorts.

Monday, 22 June 2015

Marble Gingers

Jeans. I don't know about you but I looooove wearing jeans. A good pair of jeans is a must have for most people. However finding that perfect pair in the RTW world is tricky. Especially when you are on a budget and your body is not exactly on the same wave length with the standardized clothing manufacturing world. Which often is the case for me. I have been thinking about one day making my own jeans that fit me well and are reasonably priced(and obviously have good quality) for as long as I have been really serious about sewing. And it has remained as a future goal, a quiet  whisper in the back of my mind saying "One day" Today I am proud to say that the day has arrived and I made me some goddamn jeans. And what a pair are they.


Meet Marble Gingers. My first go at making real jeans and a wearable muslin for the Ginger Jeans pattern by Heather. When the pattern came out I thought "Yes, this is what I need in my life" and bought it right away. If you already have the pattern, you can't say the reason why you haven't made your jeans is "I'm too busy to make my own pattern" But it still took me a while to assemble the pattern and dive into the sewing process. But I got there. And instead of feeling the water with my toes first, I dove in head first and hoped for the best. 


What you are seeing here is proof of my insanity. I took some white denim that I had been hoarding in my fabric stash and dyed it. For a muslin. Yes, you heard me right. A muslin. (I'll explain the process for getting this coloring result later in the post) I got the idea of having jeans with black and red marble effect stuck in my brain and unlike Elsa, I refused to let it go! (Dated reference for the win!)


I cut out view B in size 10 for the waist and size 12 for the hips. Then I followed the instructions provided by the pattern and hauled my ass into the jeans once they were ready for the waistband. That was when I realized I needed to make a few fitting adjustments. I had to take in 1 cm from the waist and hips and 0,5cm around the calves. Then I chopped off 4cm from the hem and lowered the waistband by 0,5cm in the front, 1,5cm on the sides and 4cm on the back. I also had to tweak the shape of the crotch curve. I didn't get the perfect result for the crotch yet, but I'm hoping to get there with my next pair.


Overall I am very pleased with the end result. I've received quite few compliments on my jeans and people have been really surprised that I actually made these. Yay for sewing ego boost!


Though they are not perfect. The issue with these jeans is that the denim is stretchy, but not enough. Which means while they do give in a bit, sometimes they can feel a bit too stiff. But they look awesome and they aren't too uncomfortable, so I'll let it slide. No pain, no gain, right?


 So to get the marble effect for my jeans I went through the following steps. First I cut out the pieces I needed from the main fabric, then made these long fabric sausages by slightly twisting the fabric lengthwise and wrapping thread around it.


Then I made a batch of black dye, threw the sausages in the dye and followed the instructions on the dye package.


After I had finished dying the sausages black, I unwrapped them and prepared a batch of red dye. Then I threw the unwrapped pieces into that. And here's where I went rogue and hoped my gut feeling was right. As I was after the marble effect, I wanted the red to be blotchy and not even, so I made less dye than needed(about 75% of the needed amount) and didn't stir the fabric in the pot as much as instructed. Stirring the fabric makes sure that the fabric is dyed evenly, but that wasn't my end goal. So I kept the stirring at minimum to ensure the dye didn't burn to the bottom of the pot. And I was so pleased with my end result. I love it when a plan comes together.


So that's it. My first jeans. First but definitely not last. Though I think I'll keep the insanity at bay with next pairs. But who knows what weird things I'll come up with next.

Friday, 8 August 2014

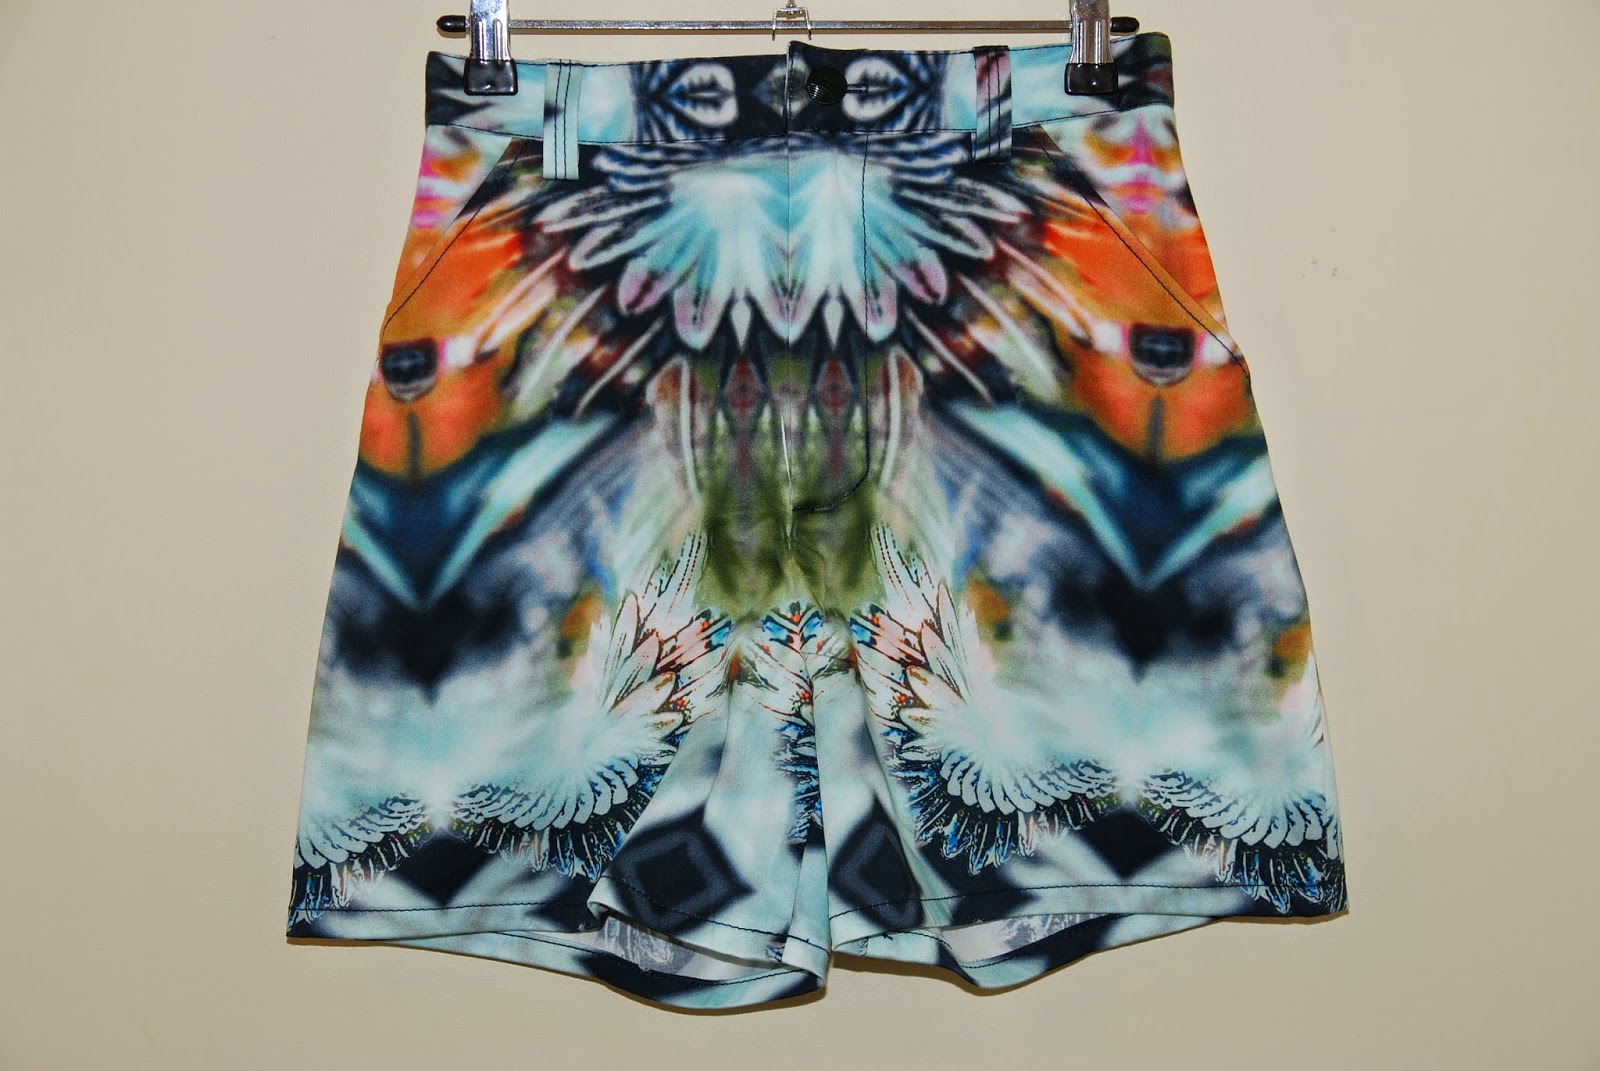
Crazy Tap Shorts

I guess it's safe to say that the pattern that defines my last month or so is Tap Shorts. My friend saw me wear my Floral Tap Shorts and asked where I found a pair of so awesome shorts. THANKYOUIMADETHEM. She demanded I make her a pair like that. So begun my journey to making my third pair of Tap Shorts.

When we went to the local fabric shop, she had her head set on buying the same floral fabric(I cringed inside, I don't want to share the print, I'm selfish!) and when we got to the section of cotton pants fabrics, she saw this. LSD floral/wings/skull/trippy/ thing with so much color and stuff going on. And we both fell in love. I would never make something like this for myself, I think I couldn't pull it off, but she was brave and just went for it. The fabric is 95% cotton and 5% elastane and feels so light.


So the pattern is Tap Shorts View C without the back pockets. I cut out a size 2 for her(she's a teeny girl) and did no alterations to the pattern. I think the pattern is actually made for her as in the fitting everything was perfect(yay, no alterations needed). When I was placing the pattern on the fabric, I was silently praying. This fabric is a nightmare for pattern placements. One little mistake and you'll end up with a buttvortex or a bullseye on something you don't want a bullseye on. Anyways, cutting took forever but I am proud of my print matching skills on the center seams. Almost perfect. I added belt loops and roll hemmed the bottom.


Have you had to make something for your friends because they fell in love with your version? Do tell.

Monday, 4 August 2014

Linen Tap Shorts + Fun Summer Tee

I think it's time to post more pictures of my bum in teh interwebz because (apparently) there aren't enough. I present to you my second pair of Tap Shorts and my first(of probably many) Fun Summer Tee.

Let's start with the shorts by Katy & Laney. I went for view C without the welt pockets in the back. As I had worked out all the fit issues in my Floral(muslin) Tap Shorts I simply put my traced pattern pieces with all the changes already made on the pattern piece and cut away. I did make sure that I had lengthened the side pocket as well because as for the muslin I took in the hips a bit, I didn't bother with resewing the pockets and the opening was WAY to small to fit my hands into pockets, haha.

I did go easier on topstitching this time. I only top stitched the pocket sides, zipper closure and waistband. I even skipped the belt loops this time cause ain't nobody got time fo dat. For hemming I used wide roll hem(like for jeans)

For the fabric I used a dark brown(Mr.Man said it's black and I'm cray-cray....Colorblind men.Sigh) cotton and linen(!!!) blend. Yes. Even though I harbored a deep dislike of wearing and sewing linen, I made a pair of linen shorts for myself(cray-cray). But I had Greece in mind and I knew that I needed to have clothes that allow my body to breathe and linen is perfect for that. Plus the fabric felt so nice and dreamy in the shop that I couldn't resist. And now. I'm a converted woman. I wouldn't go and make myself a whole outfit out of linen but for shorts-dreamy!


The top is the Fun Summer Tee by iCandy Handmade. It's a free PDF pattern that comes in one size, which is M. When I saw the pattern, I thought that it's a great stash buster. I've got a lot of jersey pieces in my stash that are big enough for making just half a shirt and this pattern is a great way to use them all. After I had pieced the pattern together and placed it on the fabric, I realized that the pieces I wanted to use were slightly too narrow. I was missing 2cm of each side. After some careful thinking and re-measuring myself and the pattern, I decided that it wouldn't be too big of a deal(besides, jersey has a lot of give). And I'm happy that I did because the fit is perfect. I think it would have been too baggy in the original size. 

For binding the neckline and armholes, I decided to give myself a headache and use binding of the opposite color. That meant 6 meeting seams that could't be off or they would look horrible. After some effort and help of seam ripper, I managed to get them all perfect and I love the outcome. I used serger to sew all the seams. For hem I used the rolled hem function with a bit of stretching on my serger. I might undo that at some point and go for regular twin needle seam. But knowing myself, I'll think about it and will never get to it. And I kind of like the contrasting color on the hem.

The fabrics are both cotton jersey. I got the red one from Abakhan years ago and I bought the white one from my local fabric shop. I'm kind of sad that I won't see the red flowers on my stash shelf anymore but hey, I've got an awesomesauce shirt now. SUCK IT STASH!


What have you been up to? Any tips on great stash busting patterns?

Tuesday, 29 July 2014

Tap Shorts Wearable muslin

This post is LOOOONG overdue. I finished these a month ago with one goal in sight. Greece. And after that I couldn't get a chance for a proper photoshoot but this weekend Mr.Man and I went out and had a shoot under the scorching summer sun(it was bright, yo) so I'm sorry my eyes are half closed because it was too hard to keep them open without squinting.

Welcome Tap Shorts by the ever so lovely Katy&Laney. This is their first pattern and I think they have done an outstanding job. Plus the pattern came out exactly at the time when I was looking for the perfect pattern for shorts. How great is that!

I thought about these as a muslin, to test the fit and see what alterations I had to make. I chose to sew the view C without the welted back pockets. I cut out a size 6 and they fit me very well around the waist. Though I had to lower the front waist a bit because it was higher on my body than the back which was perfect height. I did take in 4cm from both hips and 6cm from the bottom, I also added 5 cm to the length and I'm really happy with the length.


Because I had to lower the waist in front and take in the hips, my pocket opening is REALLY short on these. Not a big deal as I never wear stuff in my pockets anyways, but I made a note on my pattern to lengthen the pocket opening on next shorts to get the look right. I also added belt loops using my favorite method to make them.


When I started to cut the shorts out of the fabric I was terrified. In my mind I kept repeating "Watch the print placement, watch the print placement." I was super paranoid that I would overlook something and would end up with poorly placed flowers on my flower(if you know what I mean) but in the end my worries were gone when I saw that nothing is highlighting anything I didn't want to be highlighted.

Tap Shorts, RTW top from Greece, shoes from godmother


 The fabric is 95%cotton and 5% elastane and it was a delight to sew. I got so carried away with sewing and topstitching that ALL of the seam allowances ate topstitched in opposite directions. The hem is also topstitched down 2cm from the hemline(that makes 4cm in total for turns).

The pattern was well constructed. I think I had the issue with the hips being too wide as they are constructing for a more pear shaped figure while I fall under hourglass(I think). Anyways it's not a big deal as I traced the pattern(like I always do) for my size and I made the changes I needed to the traced pattern so the next pair would fit perfectly.

***
Have you sewn the Tap shorts? How did they turn out? Or are you planning to make them?


This post has been linked up in Simple Simon & Co Sewing Saturdays

Saturday, 19 July 2014

Self Drafted Linen Dresspants

So I'll break this sewing post hiatus with a bang. This week I finished a pair of dresspants for a customer who I'll name Mr.Suit. And the pants were....wait for it..from linen. Yes, I sewed something from linen. Even though I've had years of dislike towards linen, I think it's starting to pass and I think it has a lot to do with having a few victorious projects with linen.


So the pants. The pattern is drafted by me. The pants has slant side pockets, invisible button fastening and classical men's waistband with belt loops and a ribbon on the inside to  have a clean finish, classical look and good fit(I really have no idea what it's called in English. Even here a lot of the stores don't have it anymore and it's hard to find but it really takes the pants to another level)


Back view
Inside shot. The white is the ribbon thingy
I encountered a problem when I was cutting out the pants. The pattern didn't fit the fabric. And this is one of the reasons why you should always contact your seamstress/tailor before you go and buy the fabric. But luckily there's a method how I was able to fit all the pieces on the fabric. When sewing trousers, you're allowed to cut the back piece in two pieces if needed. On the inside leg seam(if you look REALLY closely), you can see a little triangle. That's the back piece and the extra seam I created to be able to get the pants out of the fabric. If you're ever in the same situation, remember, if you start to measure from the inside leg/crotch seam and measure a triangle that's up to 7cm wide and 14cm long(after sewing, so remember to add seam allowance according to your pattern), you can save a lot of fabric and time. And when done right, you won't even notice it there.

Can you find the extra piece?
I serged all the seams and hand stitched the hem with invisible stitched. I also sewed the pocket seam twice for security.

Pattern: Self drafted
Fabric: Linen (and cotton for pocket fabric)
Time spent: About 4 hours (3 for sewing + 1 for pattern drafting)

And the best part it that Mr.Suit was so happy with the pants that he ordered a suit jacket as well(hence the name Mr.Suit). So if all goes according to plan, there should be a post about a classical men's jacket popping up sometime next month. And it's also from linen(same fabric as these pants), so it's going to be one good looking summer suit(and major linen therapy for me).

Stay tuned!

This post has been linked up at Sewing Saturdays where you can see other this week's awesome projects from all around the sewing community.