Showing posts with label Shorts. Show all posts

Saturday, 5 March 2016

REVIEW: MINAs Shorts + Discount Code

Heya. About a month ago I was contacted by Joanna from Zierstoff - Simply Sew and I was asked whether I'd review one of their patterns. I browsed through their 137 patterns and decided to give the MINAs Shorts a go.

At first I cut out size 36/S based on my hip measurements from this blue patterned jersey I had in my stash and then started thinking that the fabric would look great color blocked. So I cut out the pieces in some black jersey as well and made two pairs. The instructions don't say what weight fabrics you should use. They recommend using knits or other stretchy fabrics but I think they should also say what type, because there are SOOOOO many types of knits with different amounts of stretch, weight and recovery out there. I used more lighter fabrics as I wanted to make something to sleep in, but if you'll want something that doesn't stretch out of shape and has better recovery than mine, I'd recommend using medium weight with medium stretch and great recovery. Lightweight sweatshirt fabrics would work great. In fact I am thinking about making another pair in the same fabric I used for this dark sweater.

The pattern is a PDF pattern which comes with three files. One for the pattern pieces, one for instructions and one for test print for the pattern pieces. There are also different videos on their youtube channel for various tutorials that give you an option to choose how you'd like to sew a certain step. For these shorts there are different options on how to sew the waistband.


The pattern printing was a challenge for me. I've printed my fair share of PDF patterns. Most of the patterns I have are PDF and I haven't had any trouble with printing before(unless I have been a dum-dum and forgot to check "Print Actual Size". But this time I had some issues. The pattern printed slightly off scale. The 2cm test square printed up 1,7cm even when I had the scaling to Actual Size. And as the pattern pages don't have free space on the edges of the paper like most patterns do, there was no play room with scale. I either had to print slightly off scale or lose a bit of the pattern on each page. As the shorts are drafted for a knit fabric, I decided to hope for the best, print off scale and hope that it would turn out okay. It did, mainly because the pattern pieces are so small and I tried to add the missing space by not taping the pages together, but I left space between them. The taping process took little to no time as the pattern is only nine pages which seems like nothing compared to 25+ page patterns which take a loooooooooong time to piece together. And finding my size on the pattern was super easy. All the sizes are drawn in different colours which makes tracing and cutting so much easier if you have a colour printer however the border pattern was the same for all sizes, only the colour differed between sizes. So if you don't have a colour printer or run out of some colours, you'll have a bit of a challenge on your hands. I hope in the future, they can make the borders different in pattern as well and not just colour to make the process easier to those who can't or don't want to print in colour.


When I started to cut out my size, I discovered that the gals had solved the pockets/no pockets very smartly, by just adding cutting lines for the pocket opening on the same pattern piece as the no pocket option, saving you time and paper of having to print two front pieces. But after I had cut all the pieces out of the fabrics and started sewing, I discovered that the pocket facing and opening didn't match up. I checked the pattern pieces, and confirmed that they were the same size, just different shape. The bottom of the facing matched the same size pocket piece, so I thought that maybe the facing is smaller so it won't let the pocket opening stretch out of shape. So I eased the main piece to the facing and it turned out fine. No issues with stretched out pocket openings. Yay! I sewed everything together on my sewing machine and overlocked the seam allowances for a more clean and professional look.


The instructions were clear and had helping pictures on the side of all the steps and were mostly in logical order. If I had to make a change to the instructions, I would sew the pockets as the first step. According to the instructions you are supposed to sew the center seam of the front and the back pieces first and then assemble the pockets to the front pieces. I am taught to sew all the little things first and then assemble the small pieces to big pieces. And that's what I did. I think it's much more easier to maneuver the pockets seams under your machines when the main pieces aren't sew together.


As you can see my two versions fit me quite differently. The black shorts are much more tighter and fitted than the blue ones. That's because I had slept four nights in the blue ones before taking pictures. They had stretched quite bit. But they are super comfy to sleep in. It feels like I'm not wearing pants at all. Overall I am very happy with these shorts, they have become my favorite PJ bottoms and I plan on making another pair in a more stable knit so I can wear it in the summer when walking or playing with Kessi. Or when working out(read: Playing Just Dance). There were a few mistakes to the pattern, but in the end everything worked out fine.


In conclusion these are my notes of this pattern:
- Printing slightly off scale
+ Different colours for different sizes
- Same border print for different sizes
- Recommended fabrics lack recommended weight.
+ Helpful instructions for printing out the pattern
-+ Pocket facing is smaller but in the end works out fine, I'd add a note to the instructions about this
+- I'd change the order of sewing the center seam and pockets
+ Very few pattern pages
+ Fast project
+ Helpful Youtube videos

Also as a treat to my readers, the lovely ladies at Zierstoff are offering you all a 15% discount on all patterns with the code "Spring15" (Code is valid until March 31st)

*Disclaimer. I was offered a free pattern in exchange for an honest review. All opinions are my own and reflect my own thoughts*

Friday, 26 June 2015

B&W Tap Shorts

When the weather is cold and rainy outside then blogging about shorts will make the weather better, right? RIGHT?

Last summer Katy&Laney released their first pattern- the Tap Shorts. And I instantly was drawn in by them and made two pairs for myself( Floral and Linen) and during the long heat wave they were my best friends. As the summer should allegedly be here, I wanted to be ready and greet it with new shorts.
Excuse my white pasty legs, it's been a looooooong winter.
Both last year's makes were View C, and I had planned to try out View A and B for this year. But oopsies, I made another C. Mostly because I only had enough of this fabric left for C without any pockets or pattern matching. I cut out size 6 and did no further fit adjustments from the ones I made for my previous versions. I was smart last year and marked all the changes I did to the pattern pieces and cut according to those. Thinking ahead ftw! Though I'm thinking that maybe I should make the hemline lower by a few cm. Last year the length didn't bother me, but this year it feels a bit short. Maybe it's because I haven't gotten used to short clothes yet. And because it's too cold for shorts.


Just like with my floral pair, I serged all the seam allowances and top stitched all the seams open. Call me crazy, but I actually like top stitching. I find it meditating. 


The fabric is 95%cotton and 5% elastane and feels absolutely amazing. I found it in the remnant bin at the fabric shop last year and was waiting for the right moment to cut into it. I knew I wanted a dress out of it, and after I had cut out a dress, I had enough of it left for a cute pair of shorts.

Friday, 8 August 2014

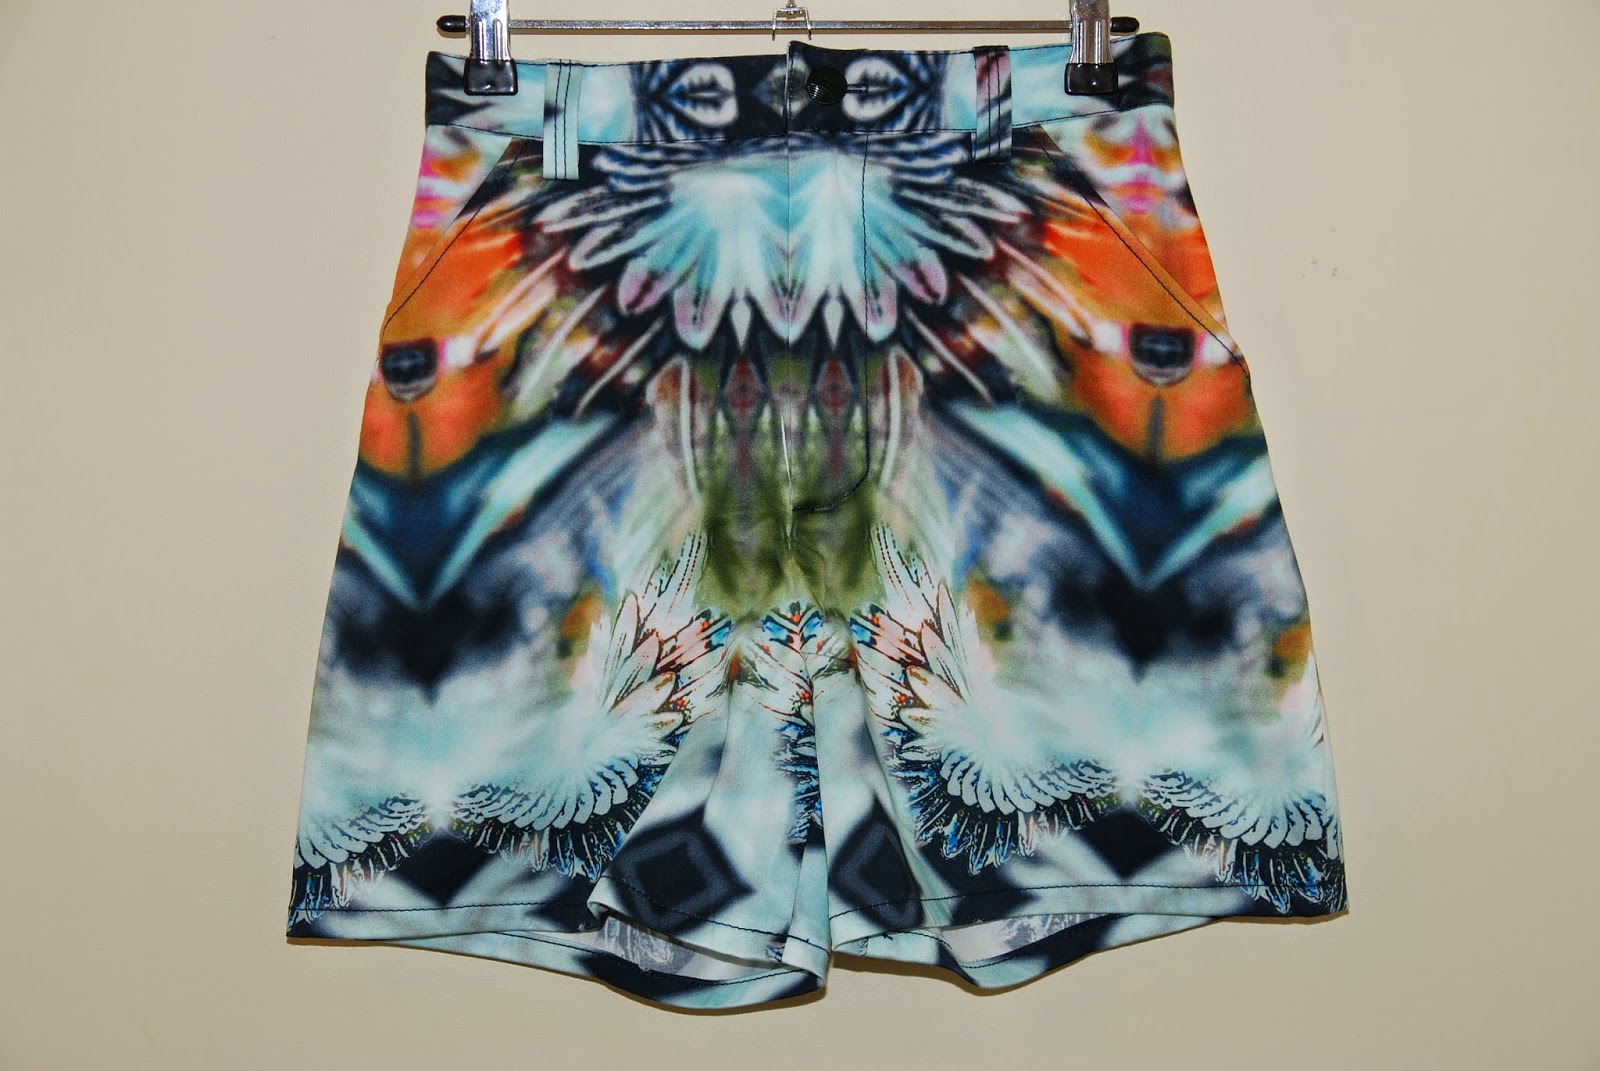
Crazy Tap Shorts

I guess it's safe to say that the pattern that defines my last month or so is Tap Shorts. My friend saw me wear my Floral Tap Shorts and asked where I found a pair of so awesome shorts. THANKYOUIMADETHEM. She demanded I make her a pair like that. So begun my journey to making my third pair of Tap Shorts.

When we went to the local fabric shop, she had her head set on buying the same floral fabric(I cringed inside, I don't want to share the print, I'm selfish!) and when we got to the section of cotton pants fabrics, she saw this. LSD floral/wings/skull/trippy/ thing with so much color and stuff going on. And we both fell in love. I would never make something like this for myself, I think I couldn't pull it off, but she was brave and just went for it. The fabric is 95% cotton and 5% elastane and feels so light.


So the pattern is Tap Shorts View C without the back pockets. I cut out a size 2 for her(she's a teeny girl) and did no alterations to the pattern. I think the pattern is actually made for her as in the fitting everything was perfect(yay, no alterations needed). When I was placing the pattern on the fabric, I was silently praying. This fabric is a nightmare for pattern placements. One little mistake and you'll end up with a buttvortex or a bullseye on something you don't want a bullseye on. Anyways, cutting took forever but I am proud of my print matching skills on the center seams. Almost perfect. I added belt loops and roll hemmed the bottom.


Have you had to make something for your friends because they fell in love with your version? Do tell.

Tuesday, 29 July 2014

Tap Shorts Wearable muslin

This post is LOOOONG overdue. I finished these a month ago with one goal in sight. Greece. And after that I couldn't get a chance for a proper photoshoot but this weekend Mr.Man and I went out and had a shoot under the scorching summer sun(it was bright, yo) so I'm sorry my eyes are half closed because it was too hard to keep them open without squinting.

Welcome Tap Shorts by the ever so lovely Katy&Laney. This is their first pattern and I think they have done an outstanding job. Plus the pattern came out exactly at the time when I was looking for the perfect pattern for shorts. How great is that!

I thought about these as a muslin, to test the fit and see what alterations I had to make. I chose to sew the view C without the welted back pockets. I cut out a size 6 and they fit me very well around the waist. Though I had to lower the front waist a bit because it was higher on my body than the back which was perfect height. I did take in 4cm from both hips and 6cm from the bottom, I also added 5 cm to the length and I'm really happy with the length.


Because I had to lower the waist in front and take in the hips, my pocket opening is REALLY short on these. Not a big deal as I never wear stuff in my pockets anyways, but I made a note on my pattern to lengthen the pocket opening on next shorts to get the look right. I also added belt loops using my favorite method to make them.


When I started to cut the shorts out of the fabric I was terrified. In my mind I kept repeating "Watch the print placement, watch the print placement." I was super paranoid that I would overlook something and would end up with poorly placed flowers on my flower(if you know what I mean) but in the end my worries were gone when I saw that nothing is highlighting anything I didn't want to be highlighted.

Tap Shorts, RTW top from Greece, shoes from godmother


 The fabric is 95%cotton and 5% elastane and it was a delight to sew. I got so carried away with sewing and topstitching that ALL of the seam allowances ate topstitched in opposite directions. The hem is also topstitched down 2cm from the hemline(that makes 4cm in total for turns).

The pattern was well constructed. I think I had the issue with the hips being too wide as they are constructing for a more pear shaped figure while I fall under hourglass(I think). Anyways it's not a big deal as I traced the pattern(like I always do) for my size and I made the changes I needed to the traced pattern so the next pair would fit perfectly.

***
Have you sewn the Tap shorts? How did they turn out? Or are you planning to make them?


This post has been linked up in Simple Simon & Co Sewing Saturdays