Showing posts with label Tutorials. Show all posts

Wednesday, 20 January 2016

One seam continuous bias tape

Heya. Today I would love to continue on the topic of bias tapes. In my last post I shared my favorite method how to make continuous bias tape and this time I'll show you the second way that I sometimes use. There is an alternative option to this method (see this Craftsy post) however I find it not the best as you'll end up with a lot of seams crossing and it'll add to much unnecessary bulk. But while it is not the right method for me, it doesn't mean it can't be right for you. Sewing is a journey and we all need to find our own path. Anywhoo on to the good stuff. 


First of all you need to gather your resources. You'll need:

  • Fabric
  • Chalk or any other fabric marking tool. I have a mechanical pen with chalk filling. Found it in a craft store with different chalk colours and I am addicted to it. I have four colours: White, gold, pink and grey.
  • Fabric scissors
  • Pins
  • Ruler
  • Rotary cutter
  • Cutting mat

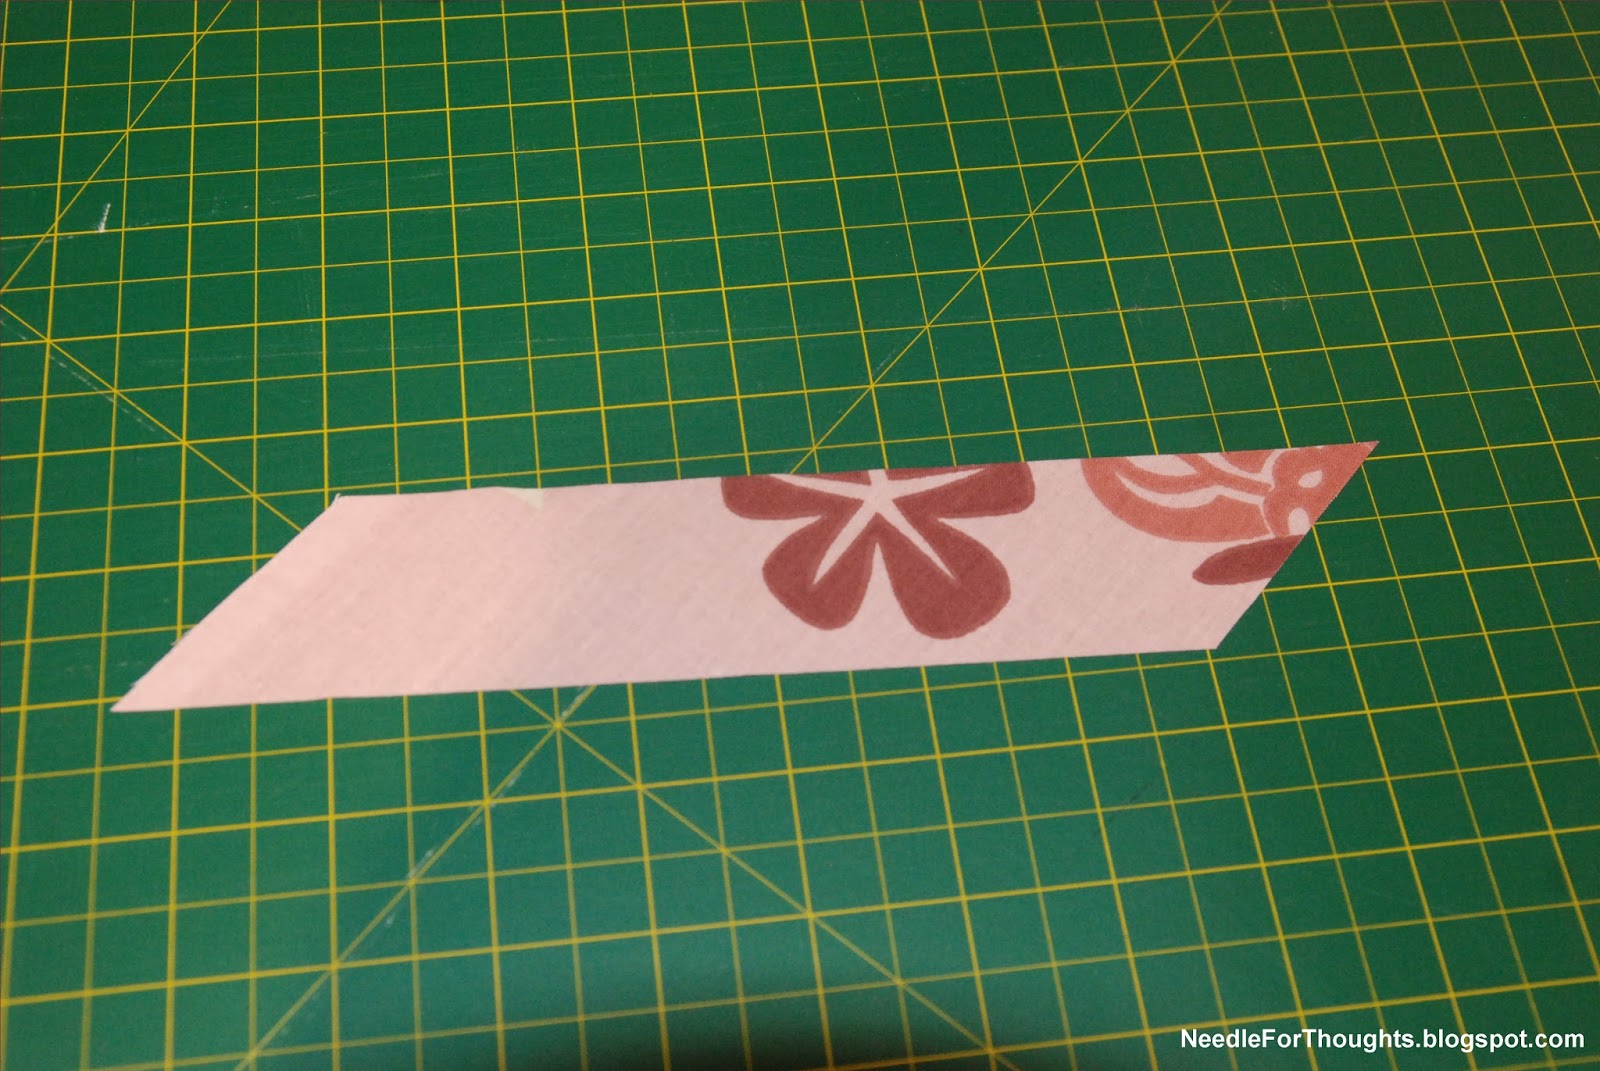
Then you'll want to take your fabric, cutting mat, ruler and rotary cutter. Cut your fabric so it has two opposite sides on the grain and two opposite sides on the bias. You'll end up with a trapeze shaped piece of fabric like the one below. The size of the piece is totally up to you, but in order to save fabric, you can measure the width of your desired bias tape multiplied by how much tape you'll need from the first bias cut before you make the second bias cut. Make sure that you measure under 90 degree angle from the bias. If you don't have a rotary cutter, simply mark a line on the bias and cut it with scissors.


Now mark your bias tape width to the fabric as many times as you wish/need. Here is where having a acrylic quilting ruler really comes handy. These lines will serve as cutting lines later.


After you have finished marking your cutting lines, pin the on the grain sides together. Match the already cut side with the first marked line to create a spiral of lines. At first the pinning can look and feel weird but I promise, it'll be okay. Be careful to match the marked lines on the seam line for accurate cutting later.


Now take your little tube to your sewing machine and sew it together. Use a small stitch length and seam allowance. I go for 1,5mm stitch length and 0,5cm seam allowance. Don't backstitch anything as it'll create unnecessary bulk in the seam. Be careful not to sew over the pins!


After you have sewed the tube together, check that the marked cutting lines match and then press the seam allowance open. I like to press the seam allowance first as I sewed it and then open as it allegedly should blend the seam into the fabric better.


Once the seam is all pressed, start cutting the tube into bias tape. Start from one edge and follow the marked lines as you cut.


Look at all the beautiful bias tape you've made! You can now press it in any form you prefer. Single fold, double fold, half, leave it as it is, the choice is all yours.

Now you have seen two of my favorite methods how to make bias tape. This one might work better for some, but I still prefer cutting each of the strips individually with a rotary cutter and then sewing them together. The cut is cleaner that way. But that doesn't mean that is the right way for everyone.

I hope you have enjoyed this post. Next time I'll show you how to bind beautifully mitered corners. 

See you soon!

Friday, 8 January 2016

How to make continuous bias tape Vol 1

Bias tape is something I use a lot in my sewing adventures. However finding matching bias tape can be quite challenging so I end up making my own in most cases and I decided to share two methods that are the best in my opinion and today I am talking about my favorite method.


First you'll need your fabric, a rotary cutter, ruler, a cutting board and scissors


Then you need to make sure your fabric has at least two sides cut on the grain. Based on the grainline, cut one edge of the fabric on the bias(45degrees from the grainline). Once you've done that, start cutting strips of fabric on the bias with the width you like to have your tapes. I prefer 4cm of full width as it gives me nice 1 cm tape after sewing. Cut as many strips as you wish.


After you've cut your strips, you need to make sure that all the short edges of the strips are all angled in the same direction. It does not matter which direction you choose, but it is important that all pieces are identical like mine below. If your pieces don't look like mine(or mirror mine), then cut the sides under 45degree angles from the length of the strips. This will make the joining seams be angled and distribute the seam allowances and bulk. If you join your bias strips with a 90degree seam, you'll end up with a lot of unwanted bulk when sewing your bias tape to your makes.


Now that your strips are ready to be sewn together, head to your sewing machine. You'll want to use a straight stitch with a small stitch length. I find 1,5mm the best length for this as longer might unravel and shorter can be too much. When sewing, you'l'l want to match the sewing lines of the bias strips. It looks weird right now but I promise, it'll end up right. If you match the seam allowances, you'll end up with uneven tape. DON'T make any backstitching or any other seam finishing stitches at the start of finish of these seams. They'll add unwanted bulk and make a mess. This is why the stitch length is small so it won't unravel.


When you get to the end of the seam, don't cut your threads and just simply move on to the next seam. Keep going until all pieces are joined into one big strip.


If you've done everything right, you should end up with a fun looking strip of loops like this.


Now you'll want to trim off all those tiny triangles poking over the tape corners and the thread that is joining all the seams.

After you've done that, you'll have a long piece of bias tape. Now simply press the seam allowances open and press the tape into your desired form, be that single fold, double fold or anything else. I like to have my tape pressed simply in half.


And that's it! You can have all the bias tape you desire with just a few minutes of sewing and cutting. This is my favorite method of making bias tape as it can be used with scraps and the rotary cutter makes cutting so fast and neat. Also as you see each seam while sewing, you'll know when your seam lines aren't matching.


Monday, 27 April 2015

Sewing Tools: Ruffler


 Once upon a time, I was lurking around in my local fabric and sewing notions shop and stumbled upon a weird looking gadget. "? What are you?" I wondered. Never before had I seen such a thing and I was instantly curious as to what it does. It automatically gathers and pleats all types of fabrics? I have been slightly underwhelmed by the standard  on my sewing machine as it is quite picky about how and what types of fabric it gathers so I decided to try out the ruffler. 

It looks like something out of a steampunk meets futuristic movie. And at first I thought it was quite intimidating with all of the moving parts, screws and setting. However after reading through the instructions and taking a quiet moment to get to know Ruffie(like I like to call him), I realized that he's a really awesome gadget and a must have in one's sewing arsenal.


You can gather/pleat(depending on the settings) simply one piece of fabric or gather/pleat one layer of fabric while you sew it to another layer of fabric that is not gathered/pleated. Which is great when you are making something where you have to gather a lot of pieces and then sew them onto regular fabric(for example if you're making pettiskirts)

Ruffie functions based on stitch length, gather/pleat depth and pleat/gather interval. There are four options for pleats. Pleat every stitch(interval 1), which creates gathers, pleat every 6th or 12th stitch(which creates pleats) and the forth setting is no pleating. The depth of the pleats can be manually regulated with the black screw in front of the foot. I made a few examples of each setting. The stitch length was 2,5 unless otherwise stated so you can see the difference the different settings make.
Interval: 1
Depth: 1
Stitch: 2,5
Interval:1
Depth: 1
Stitch 1,5
Interval: 1
Depth: 4
Interval: 6
Depth: 2

Interval: 6
Depth: 8
Interval:6
Depth:6
Interval: 6
Depth: 6
Interval: 12
Depth: 8


I love that the whole process is automated, all you have to worry about is keeping the sewing line straight. But as there are handy seam allowance guides on the foot, that's really easy. Also there's no risk of your gathers disappearing because you pulled the wrong thread or the thread breaking and having toi start all over or any other horrors as you face with gathering by hand  as the machine sews through the gather as it gathers so it's all set and ready to go. I used Ruffie to create the gathers on the sleeves of this dress and I was amazed on how even and neat the pleats were.

You can find the Ruffler/Ultimate Ruffler in Amazon/eBay or in your local sewing shop. There are cheaper and more expensive versions available. I paid around 30€ for mine but I think it was totally worth it.

Disclaimer. I was not asked or paid to write this post. I just wanted to share something I think is a great addition to one's sewing tool collection.

Friday, 13 March 2015

Become the Boss of Overlocking.

Hi there! Overlocks/sergers can be scary and intimidating at first glance. Okay, they are still scary the second time you look at them but they are actually your best friend when you buck up and tame that beast of a machine. And to do that I have a little tutorial to share with you on how to improve your serger skills and build confidence so that you don't feel overwhelmed and scared next time you have to use one for your projects.

First you are going to need the following items:
  • A serger/overlocker that is ready to go and threaded with threads that are the opposite color of your fabric(so you can see your work better)
  •  These three templates. Two circles and one funky K shape. You can download the template PDF file here. The template is FREE, but if you wish to show your thanks in payment, you can donate to the blog by clicking the "Donate" button on the right.
  •  A piece of fabric (it doesn't have to be pretty, it can be any random piece you have lying around. I do recommend fabric with no or very little patterns/prints on it as it's easier to look at while you are concentrating and you can see better what you are doing)
  • Fabric scissors or rotary blade+cutting mat, and paper scissors
  • Thread snips


Step 1.
Cut out the shapes on the three templates. I also traced them onto a thicker and more durable paper that would last the pinning longer. Then place them on the fabric. Grain direction is not important.


Step 2.
Cut out your fabric pieces. You can cut out as many duplicates as you wish. I cut out two of each shape. Now put the smaller circle and the K-shape away for the time being. You'll want to tackle the bigger circle first to warm up and get the idea and feeling of the exercise.


Step 3.
Go to your serger and place your fabric under the presser foot so that the raw edge is barely touching the knife. Don't disengage your knife and try not to cut off any fabric. Slowly start going around the edge of the circle. Sew for a bit and when you see your knife or needle not hitting the fabric right, lift the presser foot and turn the fabric a bit. You are going to want to turn the fabric gradually and evenly to avoid sharp corners in the seam. Don't worry about going too slow, you are building your skills, so going slow at first is not a bad thing.


As you are going around the shape, you should start seeing your progress in no time.


Step 4.
Once you've gotten around the whole circle, you'll want to just simply finish the serger seam by "riding off to the sunset", or going straight off the edge(if you want to say it in a more boring manner). If your stitching is wobbly or has clear visible turning corners, you might want to take a new piece and try again. You want to get smooth line that simply follows the edge. If your swatch looks like mine below, you can move on to the next step (or try the same thing one last time, to be sure you've got this piece down)


Step 5.
Now take the smaller circle pieces and go around the edges just like you did with the bigger circle. As the curve is bigger on this one, you'll find yourself working harder to get around that shape. Just take your time, take a deep breath and keep going. Try to get the best result you can and once you feel like you have conquered this shape as well, you may eat a bit of chocolate(or any other kind of snack you like) as a reward and move on to the final shape.


Step 6.
Take that scary looking K-shape and put it under the serger. You'll want to start from a corner, I like to start so that the longest straight edge is the first seam I make. Serge the straight edge until you reach the next corner.


Step 7.
Once you reach the corner, go until you are at the very end of the line where the next time your needle would go down, it wouldn't hit the fabric anymore. Lift the presser foot and gently turn the next raw edge to the machine. You might need to pull the threads only slightly so that the fabric can go under the presser foot and needle better. Make sure that your needle would hit the edge of the fabric with the first time it goes down.


Step 8.
Now you should be heading towards one of those scary slits in the bottom and top of the K. Take a deep breath, it's not that scary. Just start slowly moving towards the tip of the slit.


Step 9.
Stop when your knife is just about to start cutting the slit deeper.Lift your presser foot and make tiny little folds on the fabric at the tip of the slit so that the raw edge becomes a straight line instead of a deep notch.


Step 10.
Now very slowly keep going until your needle is about to hit the first fold in the fabric. Don't let your needle go through that fold unless you want to have folds in your final result.


What you'll want to do is lift your presser foot again, release the first(or first two) folds so that the fabric starts to turn behind your needle. The already serged area will start pulling the corner form straight folded mess into a sharp corner. Slowly make a few stitches, make sure not to sew through any other folds, let the next folds free when you get to them and continue what you have been doing. Keep an eye open for the fabric getting pulled into the moving parts, you don't want that to happen so be careful and take your time here.


Step 11. 
Once you have gotten past the inner corner, go straight again until you make it to the outer corner and repeat step 7. And now just keep going along the edge, combining the methods and movements you learned with the circles and the first slit in the K-shape.


Step 12.
If you are anything like me, you are going to do the last shape A LOT before they look perfect. But in the end you should end up with shapes that are finished neatly and look like this kind of serging comes as easily as breathing. While we all know you considered attacking your serger with a hammer and swear to never use a serger again. I know I did when I first tried this to master serging. But the final result is worth it. Take  a step back and admire your work.


So that's it! I hope you enjoyed this little tutorial/trick/guide/thing. When I was studying tailoring, our practice teacher made us slave away behind the serger and master the dreaded K. But now I am grateful she did, because it has made serging all sorts of weird shapes so much easier. If you have ever tried to serge the front of a pair of pants and tried to get around that pesky little zipper facing, you'll know what I'm talking about. Plus this boosts your confidence and makes you get to know your serger a lot better. So the next time your project requires finishing seams with a serger, you'll have the security of knowing you have already bonded with your serger.

Did you find this helpful? Do you have any tips and tricks to improve serging skills yourself? Let me know and do share your thoughts if you try this method.

Wednesday, 23 July 2014

Quick tip: Easier way to make belt loops.

Today I want to share an easy way how to sew belt loops with minimal effort but still perfect result.
I started to use this method while I was still studying tailoring and I felt kind of lazy and sometimes being lazy creates the best results.

The main thing that I do differently is how I cut out my fabric for the loops. I've seen with a lot of patterns that they let you cut out the loop fabric in the size for one loop and you have to cut out a million little pieces but I cut them in one long strip. Anyways. Let's get to work!


 Step one:
Get your fabric, shears(or rotary cutter+your rotary cutter board), ruler, chalk, interfacing and most importantly your enthusiasm


Step two:
Make sure your fabric is in one layer. Now measure a strip on the fabric. The width is the width of the loop and the length is the length of one loop times the amount of loops you need. I like to use 3cm as the width(that's 1,5cm wide loop after sewing) and usually I calculate one loop as 9-10cm long and usually I use 6 loops. So in my case the strip is 3cm*63cm(I like to add a few extra cm into the length, so I can get clean edges for all loops.


Step three:
Cut out the interfacing and fuse it to the wrong side of the fabric.


Step four:
Use your overlocker/serger to serge the long sides of the strip(like above)

Ps. All the pictures for step four are super yellow. Like holy mother of yellow. I guess it has to do with the lights on that spot. Sigh


Step five:
Flirt with your iron and make the serged edges meet in the center of the strip(I like to press it into half, then press one side so that the edge is touching the center line from the last pressing and then I make the other edge touch the first edge). NB! Do not use your iron directly on your table.


Step six:
Topstitch through the whole length of the strip two times so that both edges are stitched down. Use a longer stitch length and try to get the seam as straight as you can.


Step seven:
Now you have a lovely long strip of belt loops that should look something like this. Don't worry if your serged edges aren't perfectly in the middle. As long as they are in the stitch line and not visible on the right side, you're golden.


Step voila!
Measure your strip into the needed length of your loops, cut the strip into individual little strips and ta-dah! You are ready to sew them on your awesomesauce garment.


I hope my directions were clear(I'm not the best at explaining things, haha) and some of you will try to use this method as well. Sewing individual loops is so boring and tedious, I find this much funner.

Happy sewing!